1 更新日志
202402更新:本站更新为
hugo-next
主题(工作原因仅做过渡,后续可能使用回papermod)
202508更新:更新hugo-next主题,新增更新过程中遇到的问题
2 前言
春节在家闲着无事,想到博客多日未更新,想着小更一下,便开始在轻薄本上安装Hexo,但在安装过程中无意看到了一篇关于使用hugo搭建博客的文章,让我想起了身边一位大佬(
链接在此
)前段时间也在用hugo搭建blog,在看了几篇有关hexo和hugo对比的文章后,决定开始折腾一下。
3 安装
3.1 Hugo
直接上
官网
,根据自身系统找到对应安装方法,并且熟悉一下基本的操作,例如新建页面之类的。在本地运行hugo server后,在
http://localhost:1313/
便能查看到默认主题下的个人博客页面,到此Hugo便安装完成了。
3.2 主题
在官网上提供了将近三百个主题,我选择了
papermod主题
。安装过程也很方便,将其仓库clone到hugo的theme文件夹中即可。由于我的博客也作为一个仓库,因此将主题仓库作为博客仓库的子模块。
1
2
3
4
5
6
| #下载并设置为子模块:
git submodule add https://github.com/adityatelange/hugo-PaperMod.git themes/PaperMod --depth=1
#当重新克隆仓库时可能要用到
#git submodule update --init --recursive # needed when you reclone your repo (submodules may not get cloned automatically)
#更新主题
git submodule update --remote --merge
|
参考了网上其他博主的做法,将主题中的layout和assert文件夹复制到站点(也就是根目录)下,因为hugo构建时根目录下的模板和样式优先级比主题里的高,因此会覆盖主题的配置,方便魔改,并且在主题更新时,可以再根据个人需求将旧版本主题的相关文件覆盖,从而实现平滑更新。
(ps. 下文的博客配置中提到的layouts或assert都是指复制到站点根目录下的文件夹,而不是主题中的同名文件夹)
最终本站的根目录结构如下:其中非自定义的都作了一些注释
 1
 2
 3
 4
 5
 6
 7
 8
 9
10
11
12
13
14
| .
|-- README.md
|-- archetypes (新建页面的统一格式,可自定义)
|-- assets (papermod主题中复制过来的,包括js和css)
|-- config.yml (站点配置文件)
|-- content (放博客文章或自定义页面例如友链、搜索)
|-- data (网站的一些数据,暂时没用到)
|-- deploy.sh
|-- i18n
|-- layouts (papermod主题中复制过来的,包括各种页面模板)
|-- public (执行hugo命令后生成,网站发布的内容)
|-- resources ()
|-- static (网站的静态资源)
`-- themes (网站主题)
|
更新:使用hugo-next主题,使用过程与papermod类似,只是换了个主题而已。
3.3 部署
现在我是GitHub+Vercel+个人域名的方案,根据个人需求爱好选择就行了,网上也有很多教程,不再赘述。
这里给出几个参考教程:
https://segmentfault.com/a/1190000040063325
https://www.leftpocket.cn/post/hugo/hugo_vercel/
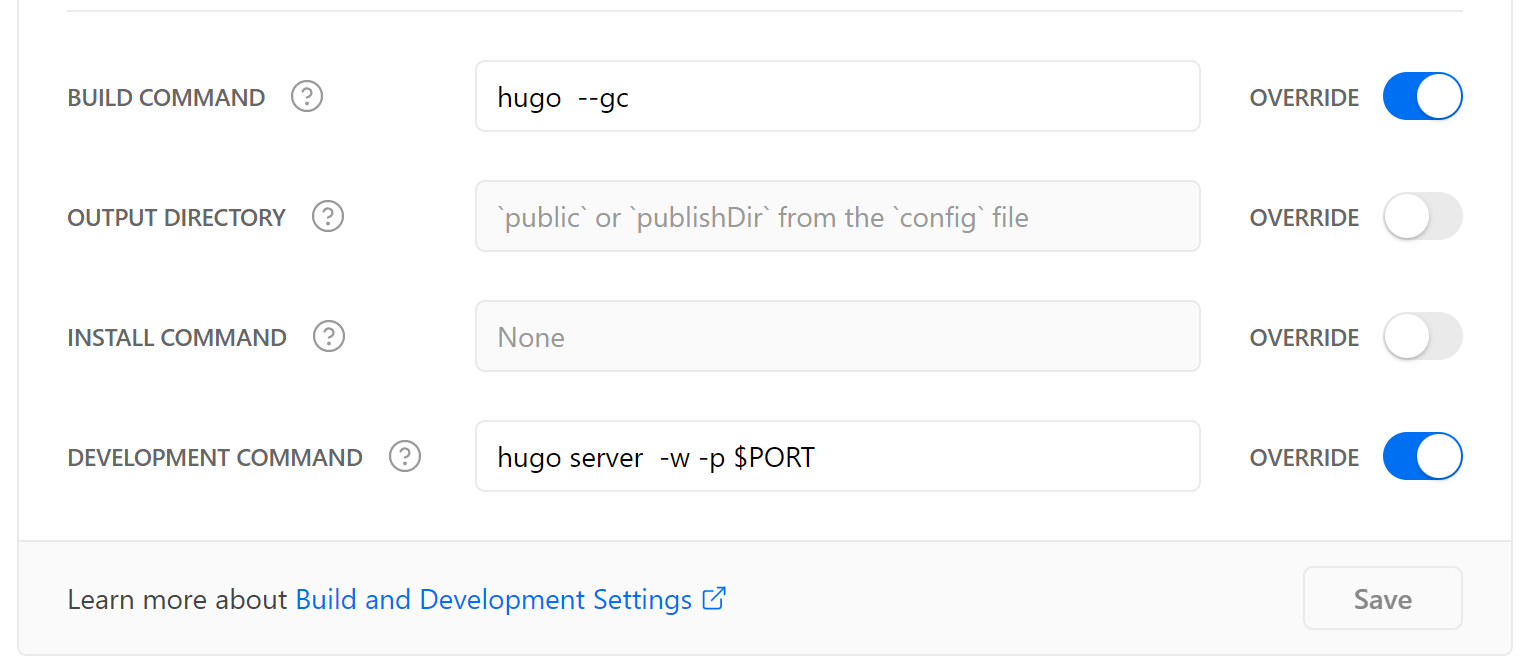
更新:升级hugo-next主题,拉取最新主题仓库文件后,将其中的assets、layout、data文件夹复制到博客本地根目录下,替代原有同名文件夹;hugo.yaml复制到博客本地根目录,重命名为config.yaml替代原有的config.yaml(建议都先备份一手,再对照着进行增量同步,特别是config.yaml,需要根据需求自行修改内容)
接着将本地文件push到github,触发vercel重新deploy,需要注意提前修改下vercel中的nodejs和hugo版本,因为主题所依赖的hugo最低版本有所变化,本次直接使用最新的hugo版本(注意要选择使用extended版本)+nodejs22.x版本:
4 个性化
4.1 配置conifg.yml
关于config.ym里的参数,可以到官网的
文档
看看(无论是了解参数含义还是以后进行魔改都很有帮助,强烈推荐),也可以到自己的主题上看看模板,例如papermod中的
demo
,参照一下对应的config.yml文件,下面列举一些配置文件中的属性:
  1
  2
  3
  4
  5
  6
  7
  8
  9
 10
 11
 12
 13
 14
 15
 16
 17
 18
 19
 20
 21
 22
 23
 24
 25
 26
 27
 28
 29
 30
 31
 32
 33
 34
 35
 36
 37
 38
 39
 40
 41
 42
 43
 44
 45
 46
 47
 48
 49
 50
 51
 52
 53
 54
 55
 56
 57
 58
 59
 60
 61
 62
 63
 64
 65
 66
 67
 68
 69
 70
 71
 72
 73
 74
 75
 76
 77
 78
 79
 80
 81
 82
 83
 84
 85
 86
 87
 88
 89
 90
 91
 92
 93
 94
 95
 96
 97
 98
 99
100
101
102
103
104
105
106
107
108
109
110
111
112
113
114
115
116
117
118
119
120
121
122
123
124
125
126
127
128
129
130
131
132
133
134
135
136
137
138
139
140
141
142
143
144
145
146
147
148
149
150
151
152
153
154
155
156
157
158
159
160
161
162
163
164
165
166
167
168
169
170
171
172
173
174
175
176
177
178
179
180
181
182
183
184
185
186
187
188
189
190
191
192
193
194
195
196
197
198
199
200
201
202
203
204
205
206
207
208
209
210
211
212
213
214
215
216
217
218
219
220
| baseURL: "https://adityatelange.github.io/hugo-PaperMod/" # 博客网址
title: PaperMod # 博客名称
paginate: 5 # 分页的文章基数
theme: hugo-PaperMod # 主题
enableInlineShortcodes: true # 是否允许shortcodes
enableRobotsTXT: true # 是否允许爬虫抓取到搜索引擎
buildDrafts: false # 是否渲染标注为草稿的文章
buildFuture: false # 包含发布日期在未来的文章
buildExpired: false # 包含已经过期的文章
enableEmoji: true # 是否允许使用emoji
# googleAnalytics: UA-123-45
minify:
disableXML: true
# minifyOutput: true
languages: # 配置多语言
en:
languageName: "English"
weight: 1 # 语言优先级,数值越低优先级越高
menu: # 菜单项
main:
- name: Archive # 归档
url: archives # 页面的url(相对于网址主页)
weight: 5 # 权重,数值越大权重越高,越靠近页面左边
- name: Search
url: search/
weight: 10
- name: Tags
url: tags/
weight: 10
- name: Categories
url: categories/
weight: 10
fr:
languageName: ":fr:"
languageAltTitle: French
weight: 2
title: PaperModL2
profileMode:
enabled: true
title: PaperMod
# imageUrl: "#"
# imageTitle: my image
# imageWidth: 120
# imageHeight: 120
subtitle: "☄️ Fast | ☁️ Fluent | 🌙 Smooth | 📱 Responsive"
buttons:
- name: Blog
url: posts
- name: Tags
url: tags
menu:
main:
- name: Archive
url: archives/
weight: 5
- name: Tags
url: tags
weight: 10
- name: Categories
url: categories
weight: 10
- name: Series
url: series
weight: 10
- name: NullLink
url: "#"
- name: NullLink2
url: "#"
- name: NullLink3
url: "#"
fa:
languagedirection: rtl
weight: 3
title: PaperMod RTL
homeInfoParams:
Title: "Hi there \U0001F44B"
Content: Welcome to RTL layout
menu:
main:
- name: Tags
url: tags
weight: 10
outputs: # 自定义输出格式
home:
- HTML
- RSS
- JSON
params:
env: production # to enable google analytics, opengraph, twitter-cards and schema.
description: "Theme PaperMod - https://github.com/adityatelange/hugo-PaperMod"
author: Theme PaperMod
# author: ["Me", "You"] # multiple authors
defaultTheme: auto
# disableThemeToggle: true
ShowShareButtons: true # 是否允许在文章末尾显示分享按键
ShowReadingTime: true # 是否显示阅读时间
# disableSpecial1stPost: true
displayFullLangName: true
ShowPostNavLinks: true
ShowBreadCrumbs: true
ShowCodeCopyButtons: true # 代码一键复制
ShowToc: true # 是否在每一篇文章中显示目录
# comments: false
images: ["papermod-cover.png"]
profileMode: # papermod的三种模式中的一种
enabled: false
title: PaperMod
imageUrl: "#"
imageTitle: my image
# imageWidth: 120
# imageHeight: 120
buttons:
- name: Archives
url: archives
- name: Tags
url: tags
homeInfoParams:
Title: "PaperMod"
Content: >
Welcome to demo of hugo's theme PaperMod.
- **PaperMod** is a simple but fast and responsive theme with useful feature-set that enhances UX.
- Do give a 🌟 on Github !
- PaperMod is based on theme [Paper](https://github.com/nanxiaobei/hugo-paper).
socialIcons: # 社交图标
- name: github
url: "https://github.com/adityatelange/hugo-PaperMod"
- name: KoFi
url: "https://ko-fi.com/adityatelange"
- name: RsS
url: "index.xml"
editPost: # Post-Meta中的一个跳转链接,可以根据个人需要修改,主题用来收集意见
URL: "https://github.com/adityatelange/hugo-PaperMod/tree/exampleSite/content"
Text: "Suggest Changes" # edit text
appendFilePath: true # to append file path to Edit link
# label: # 覆盖博客左上角标签
# text: "Home"
# icon: icon.png
# iconHeight: 35
# analytics: # 谷歌分析
# google:
# SiteVerificationTag: "XYZabc"
# assets: # 网站的图标
# favicon: "<link / abs url>"
# favicon16x16: "<link / abs url>"
# favicon32x32: "<link / abs url>"
# apple_touch_icon: "<link / abs url>"
# safari_pinned_tab: "<link / abs url>"
# cover:
# hidden: true # hide everywhere but not in structured data
# hiddenInList: true # hide on list pages and home
# hiddenInSingle: true # hide on single page
# fuseOpts: 搜索页的相关配置
# isCaseSensitive: false
# shouldSort: true
# location: 0
# distance: 1000
# threshold: 0.4
# minMatchCharLength: 0
# keys: ["title", "permalink", "summary", "content"]
taxonomies: # 分类格式
category: categories # 按类别
tag: tags # 按标签
series: series # 按系列
markup:
goldmark:
renderer:
unsafe: true
# highlight:
# # anchorLineNos: true
# codeFences: true
# guessSyntax: true
# lineNos: true
# # noClasses: false
# style: monokai
privacy:
vimeo:
disabled: false
simple: true
twitter:
disabled: false
enableDNT: true
simple: true
instagram:
disabled: false
simple: true
youtube:
disabled: false
privacyEnhanced: true
services:
instagram:
disableInlineCSS: true
twitter:
disableInlineCSS: true
|
4.2 选用自己喜欢的social icon
在美化博客的过程中,发现主题的social icon都是黑白,其实挺简洁的,但我想看看能不能改一下,毕竟很多logo都是彩色的,于是想着折腾一下。
网站所有的svg图标都放在了svg.html文件中,它在layouts文件夹下的partials中,用VScode(能看到源码就行)打开后找到自己想改的或者想加的icon名称,这里以GitHub为例子:
修改<svg>标签,改成你找到的或者自己设计的svg代码就可以了,更改前后效果如下:
大功告成,其他的图标同理。
这里推荐一下我用来找icon的网站:https://www.iconfont.cn/ (如果商用的话还是要注意一下版权)
4.3 自定义友链页面
又到了这个环节,当时在搞Hexo的友链界面就搞了挺久(菜)。
根据Hugo官方文档,它们采用了
ShortCodes
,翻译过来就是简码,如果我们要将一些特殊的样式插入到md文件中,就不得不插入一些HTML代码,而简码的作用是,事先设定好某种样式的模板和对应的简码,当需要插入该样式的时候,直接使用简码插入,使得格式更加简洁,Hugo能自动将其转为HTML语言。
官方给出了
简码实例
和
如何自定义简码
,有兴趣的小伙伴可以去看看。
接下来进入操作环节,这里我把原来Hexo的友链界面迁移过来(网上有不少大佬的友链也很好看 )首先自定义一个模板,在站点的layouts下的shortcodes中创建一个links.html
 1
 2
 3
 4
 5
 6
 7
 8
 9
10
11
12
13
14
15
| {{- if .IsNamedParams -}}
<div class="card">
<a target="_blank" href={{ .Get "url" }}>
<div class="thumb" {{ with .Get "logo" }} style="background: url({{.}});"{{ end }}>
</div>
</a>
<div class="card-header">
<div>
<a href={{ .Get "url" }} target = "_blank" >
{{- .Get "name" -}}
</a>
</div>
</div>
</div>
{{- end }}
|
接着自定义CSS,根据PaperMod
说明
,自定义的CSS可以放到assets下的extended文件夹中,它会自动和主题的CSS文件绑定成一个CSS,而不需要额外进行引用说明,因此创建一个links.css
  1
  2
  3
  4
  5
  6
  7
  8
  9
 10
 11
 12
 13
 14
 15
 16
 17
 18
 19
 20
 21
 22
 23
 24
 25
 26
 27
 28
 29
 30
 31
 32
 33
 34
 35
 36
 37
 38
 39
 40
 41
 42
 43
 44
 45
 46
 47
 48
 49
 50
 51
 52
 53
 54
 55
 56
 57
 58
 59
 60
 61
 62
 63
 64
 65
 66
 67
 68
 69
 70
 71
 72
 73
 74
 75
 76
 77
 78
 79
 80
 81
 82
 83
 84
 85
 86
 87
 88
 89
 90
 91
 92
 93
 94
 95
 96
 97
 98
 99
100
101
102
103
104
105
106
107
108
109
110
111
112
113
114
115
116
117
118
119
| .links-content {
margin-top: 1rem
}
.link-navigation::after {
content: " ";
display: block;
clear: both
}
.card {
width: 130px;
font-size: 1rem;
padding: 0;
border-radius: 4px;
transition-duration: .15s;
margin-bottom: 1rem;
display: block;
float: left;
box-shadow: 0 2px 6px 0 rgba(0, 0, 0, .12);
background: #f5f5f5
}
.card {
margin-left: 16px
}
@media(max-width:567px) {
.card {
margin-left: 16px;
width: calc((100% - 16px)/2)
}
.card:nth-child(2n+1) {
margin-left: 0
}
.card:not(:nth-child(2n+1)) {
margin-left: 16px
}
}
@media(min-width:567px) {
.card {
margin-left: 16px;
width: calc((100% - 32px)/3)
}
.card:nth-child(3n+1) {
margin-left: 0
}
.card:not(:nth-child(3n+1)) {
margin-left: 16px
}
}
@media(min-width:768px) {
.card {
margin-left: 16px;
width: calc((100% - 48px)/4)
}
.card:nth-child(4n+1) {
margin-left: 0
}
.card:not(:nth-child(4n+1)) {
margin-left: 16px
}
}
@media(min-width:1200px) {
.card {
margin-left: 16px;
width: calc((100% - 64px)/5)
}
.card:nth-child(5n+1) {
margin-left: 0
}
.card:not(:nth-child(5n+1)) {
margin-left: 16px
}
}
.card:hover {
transform: scale(1.1);
box-shadow: 0 2px 6px 0 rgba(0, 0, 0, .12), 0 0 6px 0 rgba(0, 0, 0, .04)
}
.card .thumb {
width: 100%;
height: 0;
padding-bottom: 100%;
background-size: 100% 100%!important
}
.posts-expand .post-body img {
margin: 0;
padding: 0;
border: 0
}
.card .card-header {
display: block;
text-align: center;
padding: 1rem .25rem;
font-weight: 500;
color: #333;
white-space: normal
}
.card .card-header a {
font-style: normal;
color: #2bbc8a;
font-weight: 700;
text-decoration: none;
border: 0
}
.card .card-header a:hover {
color: #d480aa;
text-decoration: none;
border: 0
}
|
接着在你的友链md文件中按照下面的格式添加友链就彳亍了
(由于shortcodes是全局自动检测的,因此这里的格式用Katex表示,所以有点丑😂)
$$\lbrace\lbrace\lt\ links\ name="\textcolor{red}{名字}"\ url="\textcolor{red}{链接}"\ logo="\textcolor{red}{头像(url)}"\ \gt\rbrace\rbrace$$
后话:其实我一开始友链是用网上大佬的(
传送门
),后来想了想要不自己试着把原来的友链迁移过来,发现还是挺简单的,shortcodes挺好用的,以后可以自定义一些😄
更新:使用hugo-next主题后,重新自定义了一版友链
- 修改
layouts > flinks目录下的single.html
 1
 2
 3
 4
 5
 6
 7
 8
 9
10
11
12
13
14
15
16
17
18
19
20
21
22
23
24
25
26
27
28
29
30
31
32
33
34
| {{ define "title" }}{{ .Title }} - {{ .Site.Title }}{{ end }}
{{ define "main_inner_class" }}flinks posts-expand{{ end }}
{{ define "main" }}
<div class="flinks-block">
<h1 class="flinks-block-title">{{ .Title }}</h1>
<div class="flinks-lists">
{{ range .Site.Data.flinks }}
<div class="flinks-list">
<div class="flinks-list-title">{{ .FLinksTitle | safeHTML }}</div>
<div class="flinks-list-desc">{{ .FLinksDesc | safeHTML }}</div>
<div class="flinks-list-items">
{{ range .FLinksList }}
<div class="flinks-list-item">
<a href="{{ .link }}" rel="external nofollow noreferrer" title=" {{ .name }}" target="_blank">
<div class="flinks-item-icon">
<img class="no-lightbox entered loaded" src="{{ .avatar }}" alt="{{ .name }}"/>
</div>
<div class="flinks-item-name">{{ .name | safeHTML }}</div>
<div class="flinks-item-desc" title="{{ .desc }}">{{ .desc | safeHTML }}</div>
</a>
</div>
{{ end }}
</div>
</div>
{{ end }}
</div>
<div class="flinks-list-footer"><hr/></div>
<div class="flinks-page-desc">{{ .Content }}</div>
</div>
{{ end }}
|
- 在
data目录下,新增一个flinks.yaml,当有新友链时,按照前面格式新增即可
 1
 2
 3
 4
 5
 6
 7
 8
 9
10
11
12
13
14
15
16
17
18
19
20
21
22
23
24
25
26
27
28
29
30
31
32
33
34
35
36
37
| - FLinksTitle:
FLinksDesc:
FLinksList:
- name: Fxizenta
desc: 这就是秀神的格局(●'◡'●)
avatar: https://myimage-1303975616.cos.ap-guangzhou.myqcloud.com/img/2021%E5%A4%B4%E5%83%8F.jpg
link: http://fxizenta.cn
- name: M0D1
desc: With great power comes great responsibility
avatar: https://myimage-1303975616.cos.ap-guangzhou.myqcloud.com/img/2021mdhead.jpg
link: https://m0d1.top
- name: c10udlnk
desc: A RE CTFer, a s0Ity f1sh... <。)#)))≦
avatar: https://picgo-1304285457.cos.ap-guangzhou.myqcloud.com/images/d1db99440421be140879ce61a559b1a.jpg
link: https://c10udlnk.top
- name: Sulv
desc: 一个记录技术、阅读、生活的博客
avatar: https://www.sulvblog.cn/img/Q.gif
link: https://www.sulvblog.cn
- name: luo
desc: 在一群优秀的人中间,常常以为自己是他们一员,然后忘了努力
avatar: https://picgo-1304285457.cos.ap-guangzhou.myqcloud.com/images/8f668776e41ac9da901a2df7e2a9079.jpg
link: https://luo41.top/
- name: 长街短梦
desc: 此行山高路远,我只剩口袋玫瑰一片
avatar: https://wangyunzi.oss-cn-hangzhou.aliyuncs.com/article/avatar.jpg
link: https://wangyunzi.com/
- name: Mok
desc: 俊神
avatar: https://picgo-1304285457.cos.ap-guangzhou.myqcloud.com/images/image-20220818185418571.png
link: http://mokzy.xyz
|
4.4 使网站支持KaTex
前文提到了使用KaTex,由于PaperMod没有内置KaTex,因此手动添加支持
在layouts的partials中创建KaTex.html,添加以下代码(可以根据自己需要到
官网
去找对应的代码):
 1
 2
 3
 4
 5
 6
 7
 8
 9
10
11
12
13
14
15
16
17
18
19
20
21
22
23
24
25
26
27
28
29
30
31
32
33
34
35
36
37
38
39
40
41
42
43
44
45
46
47
48
49
50
51
52
53
54
55
56
57
| <link rel="stylesheet" href="https://cdn.jsdelivr.net/npm/katex@0.15.2/dist/katex.min.css"
integrity="sha384-MlJdn/WNKDGXveldHDdyRP1R4CTHr3FeuDNfhsLPYrq2t0UBkUdK2jyTnXPEK1NQ" crossorigin="anonymous">
<!-- The loading of KaTeX is deferred to speed up page rendering -->
<script defer src="https://cdn.jsdelivr.net/npm/katex@0.15.2/dist/katex.min.js"
integrity="sha384-VQ8d8WVFw0yHhCk5E8I86oOhv48xLpnDZx5T9GogA/Y84DcCKWXDmSDfn13bzFZY"
crossorigin="anonymous"></script>
<!-- To automatically render math in text elements, include the auto-render extension: -->
<script defer src="https://cdn.jsdelivr.net/npm/katex@0.15.2/dist/contrib/auto-render.min.js"
integrity="sha384-+XBljXPPiv+OzfbB3cVmLHf4hdUFHlWNZN5spNQ7rmHTXpd7WvJum6fIACpNNfIR" crossorigin="anonymous"
onload="renderMathInElement(document.body);"></script>
<!--自动渲染扩展,支持行内公式-->
<script>
document.addEventListener("DOMContentLoaded", function () {
renderMathInElement(document.body, {
// customised options
// • auto-render specific keys, e.g.:
delimiters: [
{ left: '$$', right: '$$', display: true },
{ left: '$', right: '$', display: false },
{ left: '\\(', right: '\\)', display: false },
{ left: '\\[', right: '\\]', display: true }
],
// • rendering keys, e.g.:
throwOnError: false
});
});
</script>
|
更新:使用了hugo-next主题后,可以直接在config.yaml中配置math: katex来实现网站支持KaTex
4.5 文章draft参数失效问题
根据官方的文档,如果是草稿文章,则hugo不会进行渲染,在站点网页上不会显示出来,但我发现我的网站还是会显示,尽管在文章的front matter中添加了draft: true字段,并且在站点配置文件中也添加了buildDrafts: false字段(保证构建时跳过draft文章)。在查看了官方文档后,发现如果在执行构建时加上-D参数,还是会渲染draft文章,因此想到是不是vercel部署时默认命令里面带了-D参数,查看了果然,修改完后再部署就解决问题了。
4.6 目录侧边化
papermod主题原本的目录是在文章的顶部的,无法像之前Hexo-Next一样边浏览文章边查看目录,在官方仓库里看到有关于将文章目录放置在侧边的讨论,以及作者给出的解决代码,这里直接上链接,照着改就好了。
地址:
https://github.com/adityatelange/hugo-PaperMod/pull/675
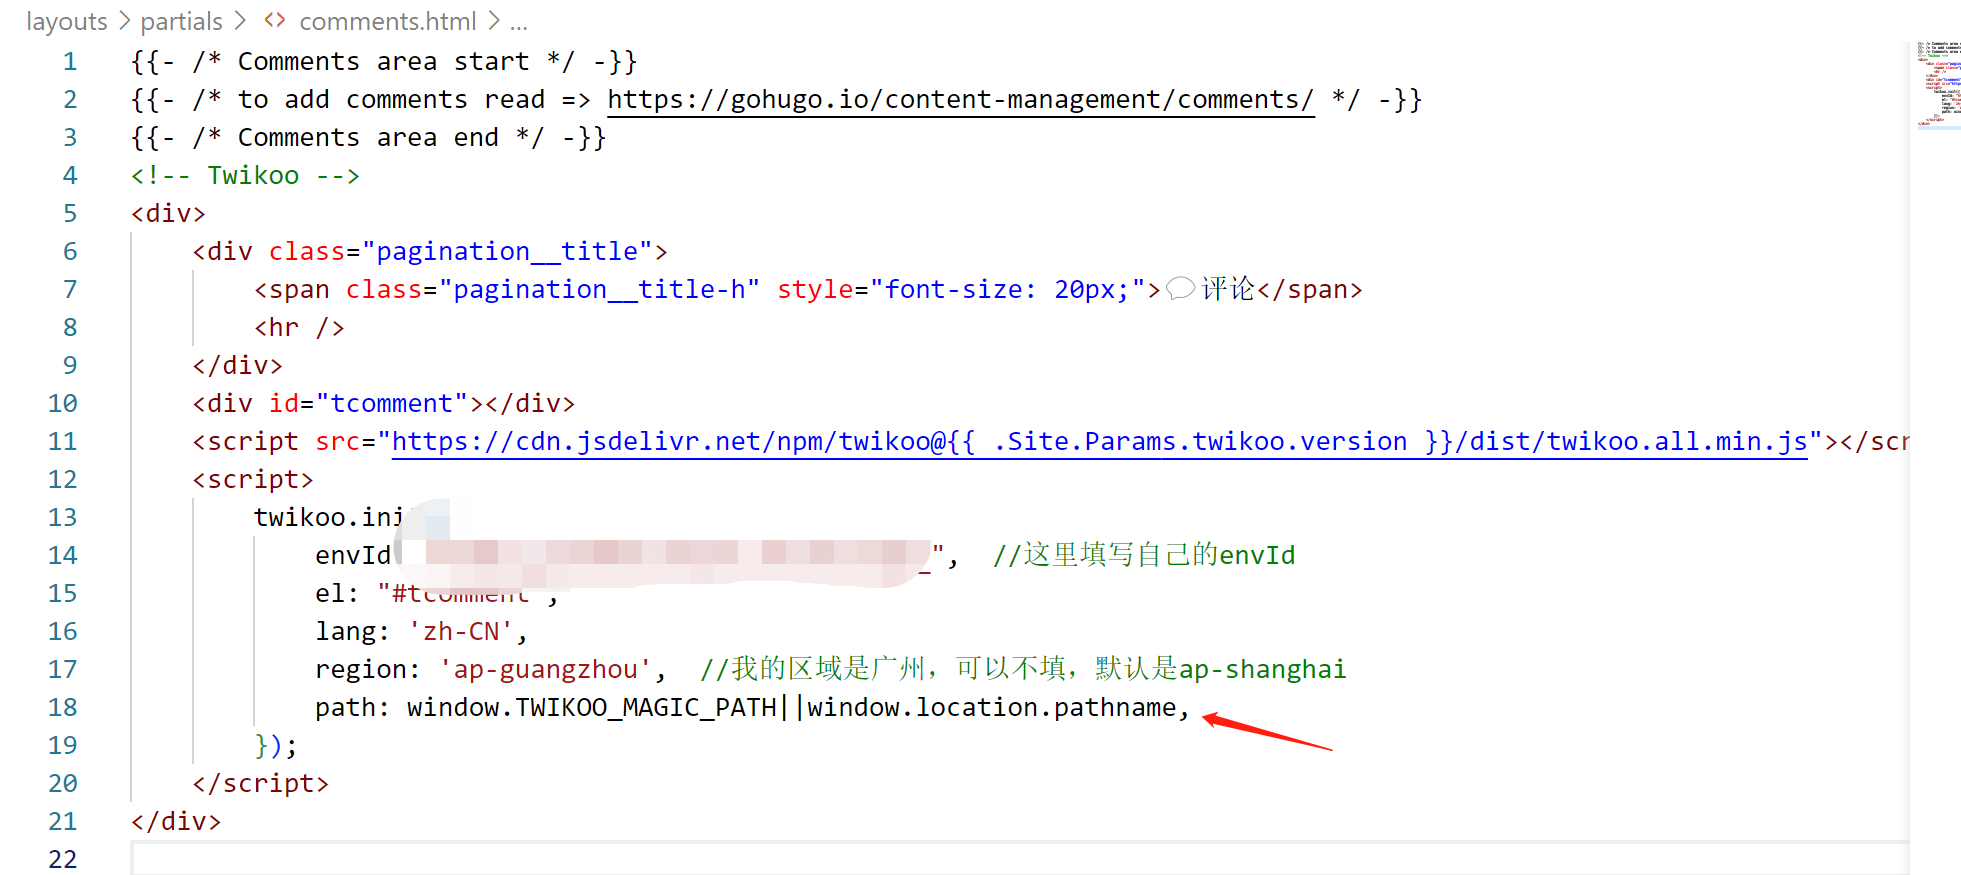
4.7 添加评论
前往 Twikoo
官网
,由于我的博客是 vercel 部署,因此也选择了
vercle部署
,按照其步骤操作即可,也可以参照这位大佬的
博客
更新:twikoo更新到1.5.7版本后,要更改path的格式,否则前端不会显示评论(数据库是正常的)

原本是有单引号的,将单引号删去
更新:使用hugo-next主题后,使用waline作为评论系统,具体配置方法见
官网
4.8 配置代码语法高亮样式
Hugo使用chroma提供语法高亮,具体的样式可到
HUGO官网
上查看,选择一个自己喜爱的样式。在config.yaml中修改参数即可。
1
2
3
| markup:
highlight:
style: monokai
|
更新:在hugo-next中,该参数放在了自定义模块中,具体方法是
- 选择喜爱的样式名称,使用
hugo gen chromastyles --style=样式名称 > 文件名称.css导出css设置 - 将该css文件放到
static > css目录下 - 在主题配置中添加自定义的样式文件路径:
1
2
3
4
| # 用户自定义文件配置
# Define custom file paths.
customFilePath:
style: /css/文件名称.css
|
以monikai为例,hugo gen chromastyles --style=github > custom-highlight.css导出css设置,然后在主题配置中添加自定义的样式文件路径:
1
2
3
4
| # 用户自定义文件配置
# Define custom file paths.
customFilePath:
style: /css/custom-highlight.css
|
4.9 配置统计网站内容
默认使用卜蒜子进行统计,配置方法很简单,在配置文件中启用即可。
1
2
3
4
| analytics:
busuanzi:
visitorsIcon: fa fa-user
viewsIcon: fa fa-eye
|
2508更新:使用51la进行统计,对比卜蒜子来说更加准确
- 前往
51la官网
,注册完成后,选择V6应用,添加统计应用
- 获取id,填入config.yaml配置文件中
1
2
| analytics:
laId: xxxxxx #输入上图中圈起来的id
|
- 开启数据挂件功能,并设置成如下(原因是hugo-next中的
resources.yaml中的laWidget就是对应如此的格式,当然可以根据自行需求配置,配置完成后,最下面的嵌入代码会同步变化,需要将其替代原来的laWidget内容。
- 最终效果
5 参考文章
官方网站:
hugo官方:
https://gohugo.io/
papermod主题官方:
https://github.com/adityatelange/hugo-PaperMod
KaTex官方:
https://katex.org/
实用网站
阿里矢量图标库:
https://www.iconfont.cn/
emoji库:
https://emojipedia.org/
一些大佬:
https://www.sulvblog.cn/
https://io-oi.me/tech/hugo-vs-hexo/
https://shuzang.github.io/