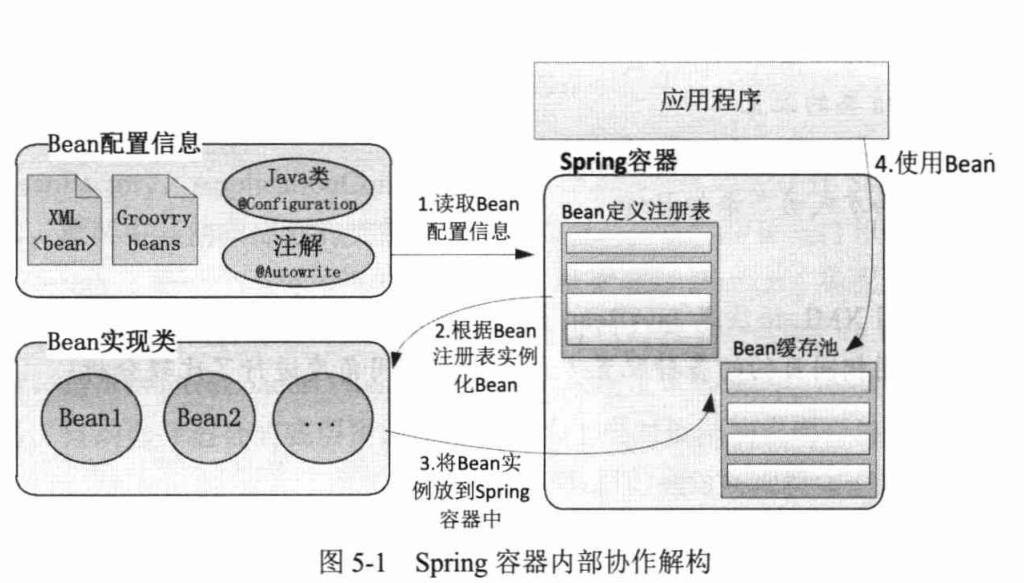
Spring容器高层视图
Spring容器启动需要三个条件:
Sprng框架的类包放在应用程序的类路径下;
应用程序为Spring提供了完备的Bean配置信息;
Bean的类已经放在应用程序的类路径下
Spring启动时读取应用程序提供的Bean配置信息,并在Spring容器中生成一份相应的Bean配置注册表,根据这张表实例化Bean,装配好Bean之间的关系,最后把这些准备就绪的Bean放到Bean缓存池中,以供外层的应用程序进行调用
Bean配置信息:
Bean的实现类;
Bean的属性信息,如数据源的连接数、用户名、密码等
Bean的依赖关系,Spring根据依赖关系完成Bean之间的装配
Bean的行为配置,如生命周期范围及生命周期各过程的回调函数等

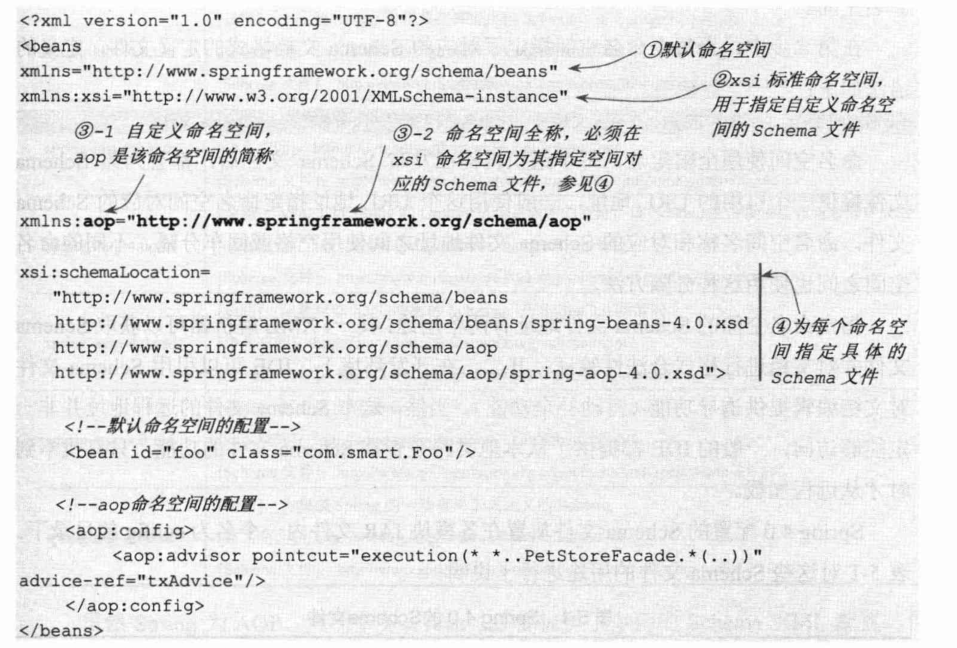
基于XML的配置
采用Schema格式
命名空间的定义分为两个步骤:
第一步指定命名空间的名称;
第二步指定命名空间的Schema文档格式文件的位置,用空格或回车换行进行分隔
在第一步中,要指定命名空间的缩略名和全名,例如图中的③处
aop为别名,文档后面的元素可通过别名加以区别,例如
aop:config/
等;而引号内的网址为空间的全限定名,习惯上用文档发布机构的官网作为全限定名,可以很好表示文档所属机构,也可以避免重名。但就语法上说,别名和限定名可任意命名
若别名为空,则表示该命名空间为文档默认命名空间。文档中无前缀的元素都属于默认命名空间,例如属于①处定义的默认命名空间
在第二步中,定义的语法如下:
命名空间使用全限定名,一般使用组织机构提供引用的URL地址,例如④处
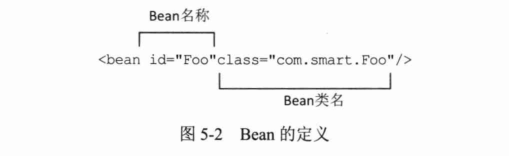
Bean基本配置
Bean的定义:
Bean的命名:
配置一个Bean时,需要指定一个唯一的id属性作为Bean的名称,并且需要满足规范:必须以字母开始,不允许逗号、空格这些非完整结束符,如果需要使用特殊符号进行命名,则可以使用的name属性。
name和id都可以指定多个名字,以逗号、分号或空格进行分隔
id可以不同而name可以相同,使用getBean方法时,传入参数若为name,则返回后面声明的Bean(覆盖了前面的name),因此尽量使用id命名
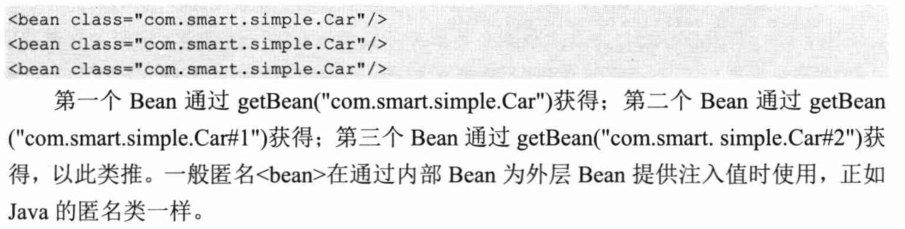
若未指定id和name属性,则Spring自动将全限定类名作为Bean的名称。
属性注入
通过setXxx()方法注入Bean的属性值或依赖对象。
Spring先调用Bean的默认构造函数实例化Bean对象,然后通过反射的方式调用Setter方法注入属性值。
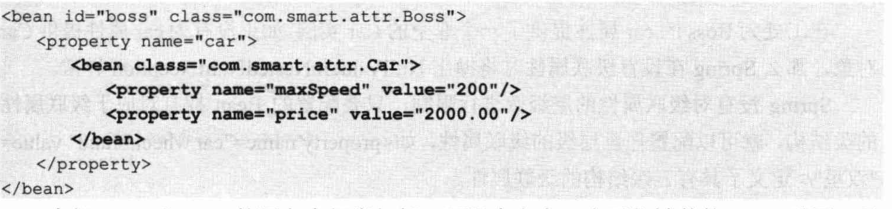
在配置文件中进行属性注入
该Bean有三个属性值,每个属性值对应一个标签,name为属性名称,maxSpeed对应setMaxSpeed()方法
Java中xxx属性对应setXxx()方法,属性变量名必须满足:“变量的前两个字母要么全部大写,要么全部小写”
构造函数注入
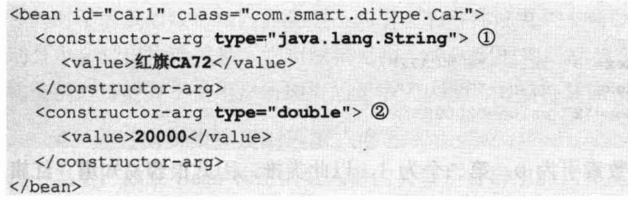
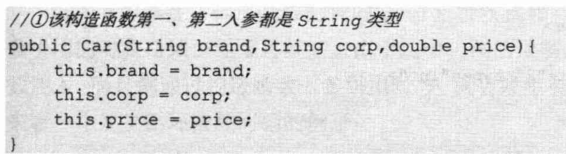
①按类型匹配入参
Bean提供带参的构造函数,在Spring配置文件使用中的type属性
1
2
3
4
| public Car(String brand, double price) {
this.brand=brand;
this.price=price;
}
|
的位置不会影响配置效果,不一定要按照参数顺序
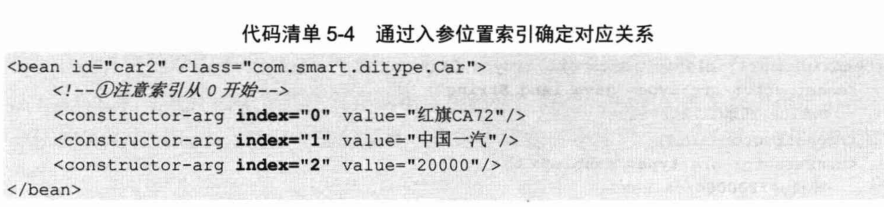
②按索引匹配入参
java通过入参的类型及顺序区分不同的重载方法。
若构造函数有两个类型相同的入参,那么方法①就无法确定了。
原因(Spring按JavaBean规范找对配置属性所对应的Setter方法,并使用Java反射机制调用Setter方法完成属性注入,但反射机制不会记住构造函数的参数名,因此只能通过入参类型确定配置项与入参的对应关系)
示例
第一个参数索引为0,依此类推
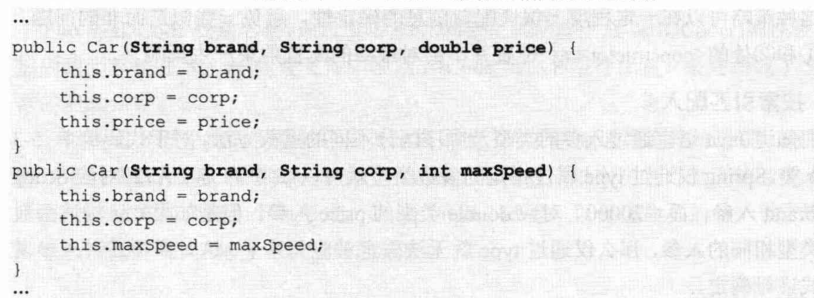
③联合类型和索引匹配入参
示例
④通过自身类型反射匹配入参
构造函数的入参的类型是可辨别的(非基础数据类型且入参类型各异)
为了避免歧义,还是显示使用index和type比较保险
⑤循环依赖问题
由于Spring容器对候造函数配置的Bean进行实例化的前提是,Bean构造函数入参引用的对象必须准备就绪。
因此若两个Bean都通过构造函数入参引用对方,则会产生类似死锁的问题。
解决的办法是将注入方式改为属性注入即可。
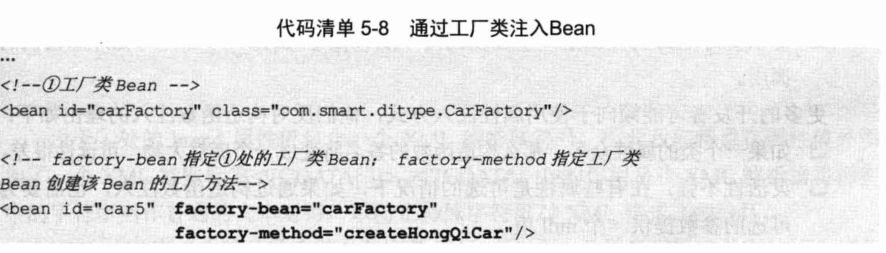
工厂方法注入
非静态工厂方法
需要实例化工厂类才能调用,工厂类方法一般以接口或抽象类变量的形式返回目标实例。
CarFactory工厂仅负责创建Car类型的对象
静态工厂方法:
无需创建工厂实例类,对其中的方法声明为static。
注入参数:
字面值
指可用字符串表示的值,通过元素标签注入。基本数据类型及其封装类、String类型都可以通过该方法注入。
Spirng内部的编辑器可以将其转换为内部变量的相应类型。
示例
 1
 2
 3
 4
 5
 6
 7
 8
 9
10
11
12
13
14
| <bean id="car" class="com.smart.attr.Car" lazy-init="default">
<property name="brand">
<value>
<![CDATA[红旗&CA72]]>
*<!--brand的属性值包含了一个XML的特殊符号
特殊标签<![CDATA[]]的作用是让XML解析器让标签中的字符串
当作普通的文本对待-->*
</value>
</property>
<property name="maxSpeed">
<value>200</value>
</property>
<property name="price" value="2000.00" />
</bean>
|
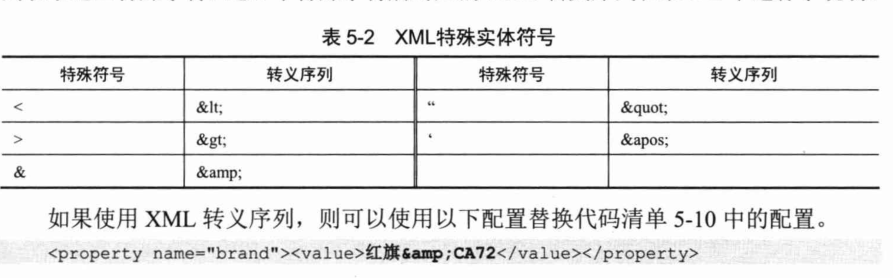
XML中共有五个特殊字符,分别是**&、<、>、“、‘**
若注入值包括这些特殊字符,有两种方法
①采用特殊标签
②使用XML转义序列
注:Spirng不会忽略元素标签内部字符串的前后空格,会将其一起赋给对应属性
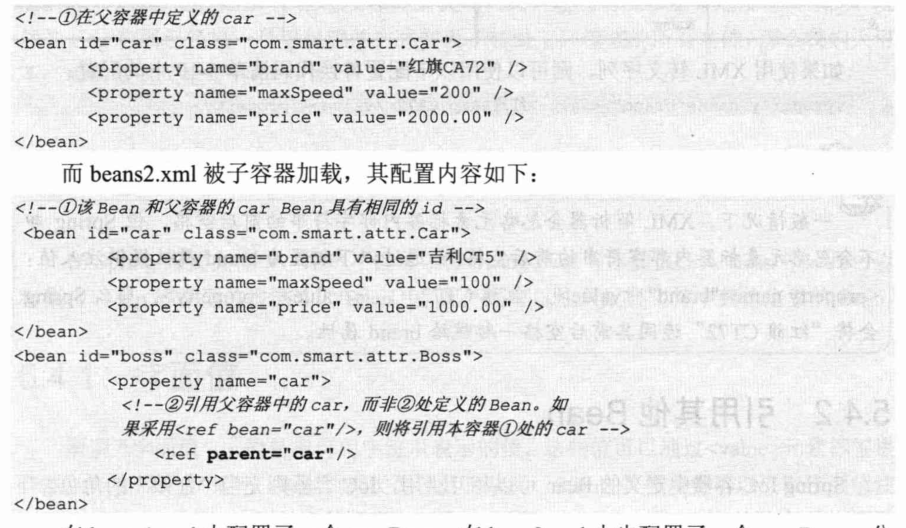
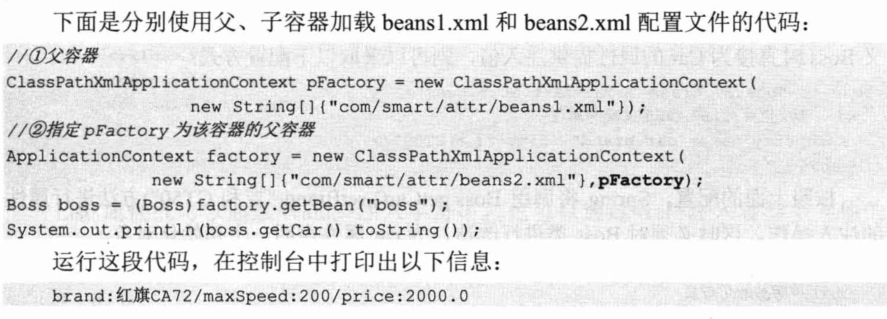
引用其他Bean
[元素通过三个属性引用容器中的其他Bean]
bean:通过该属性可以引用同一容器或父容器的Bean
local:引用同一配置文件中定义的Bean
parent:引用父容器的Bean
示例:
bean2中的boss引用了父容器中的car
null值
使用 元素标签而不是
内部Bean
类似于java的匿名内部类
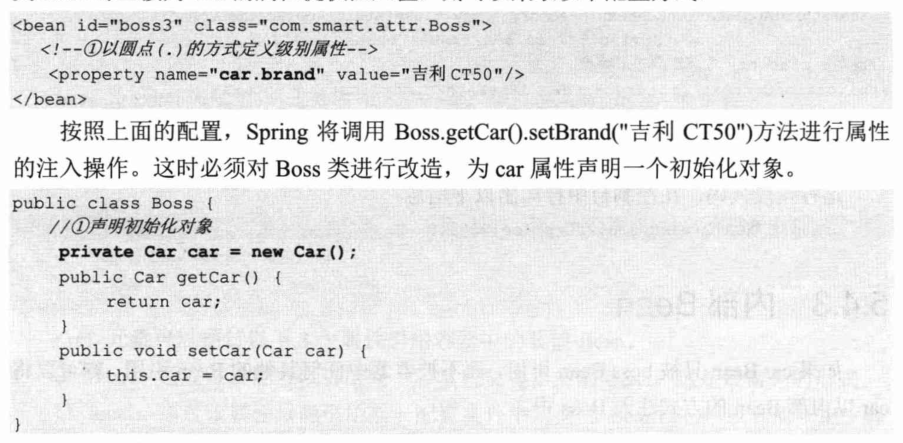
级联属性
需要类提供一个级别的实例化,采用圆点(.)的方法定义级别
示例:
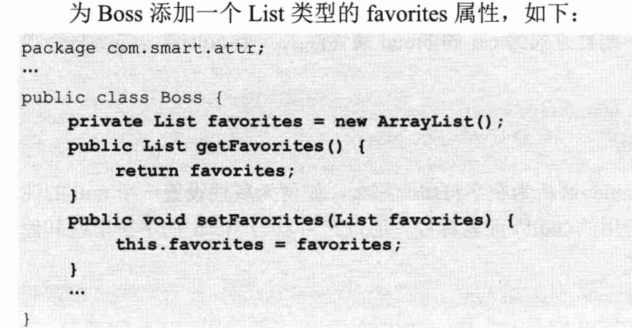
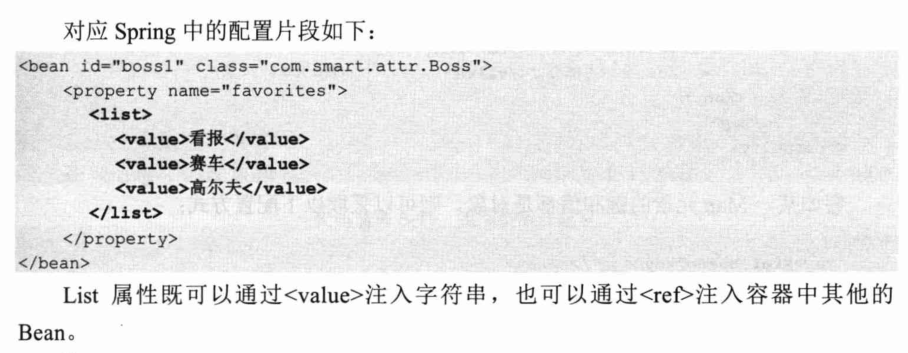
集合类型属性
List
Set
Map
如果某一Map元素的键和值都是对象,则采用以下配置方式:
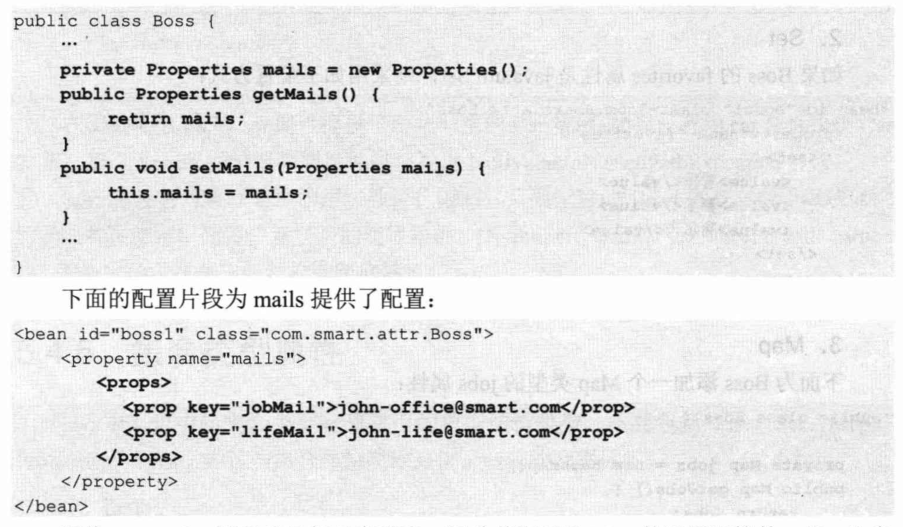
Properties
Map类型的特例,键和值的类型只能是字符串
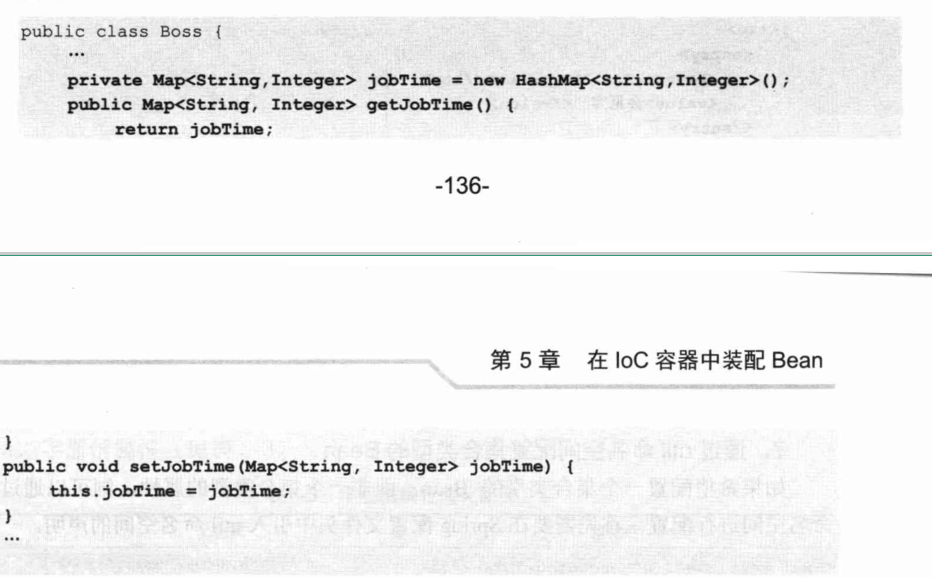
强类型集合
强类型的Map类型,键为String,值为Integer
配置与非强类型集合相同
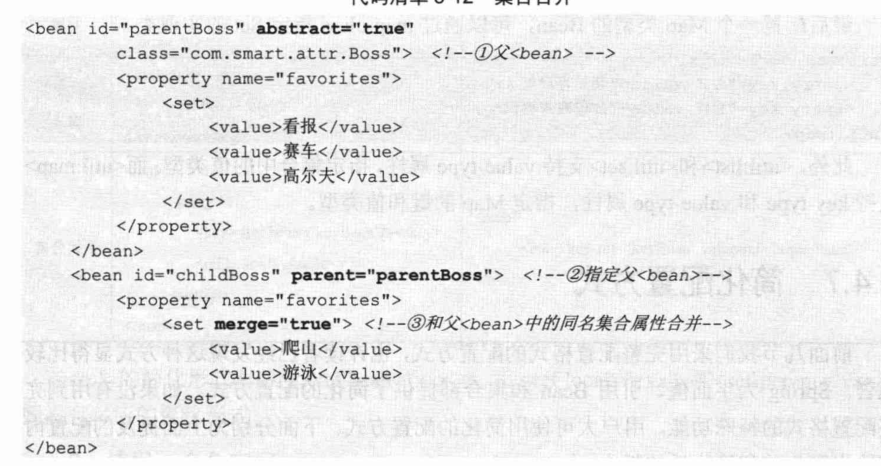
集合合并
允许子继承父的同名属性集合元素,并将两个的属性值合并起来作为最终Bean的属性值
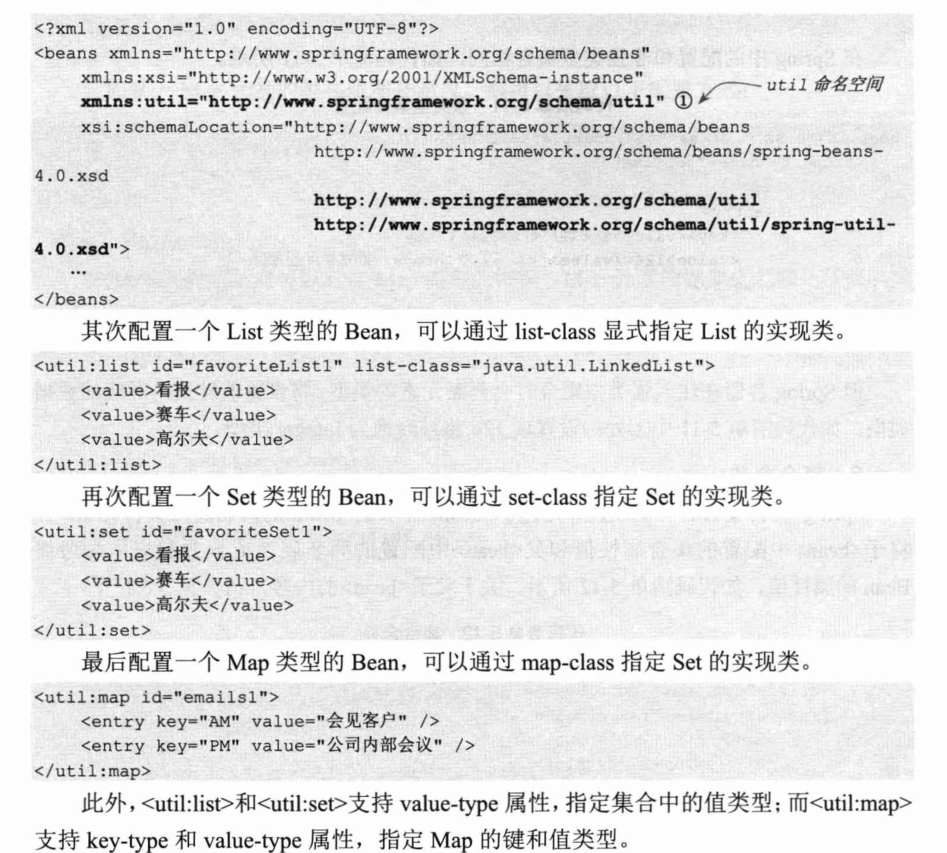
通过util命名空间配置集合类型的Bean
希望配置一个集合类型的Bean,而不是属性
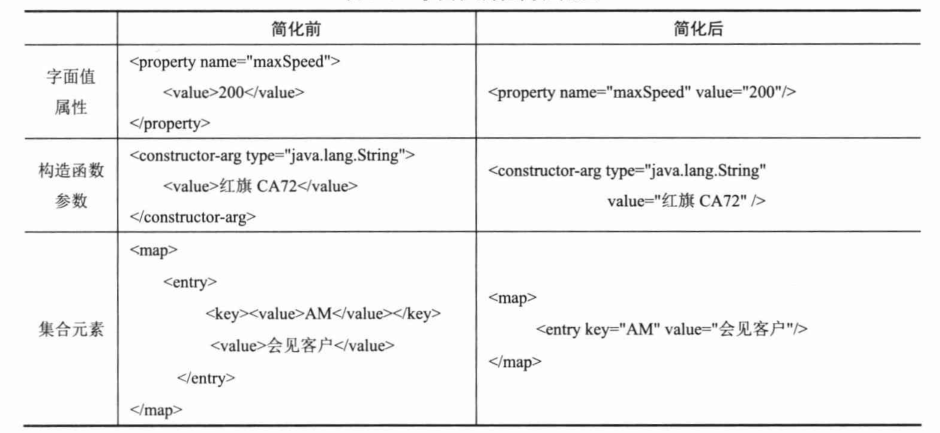
简化配置
字面值属性
注意:简化后无法使用处理XML特殊字符,只能用XML转义序列对特殊字符进行转换
引用对象属性
注意:只有[有简化形式,即][,而local和parent没有对应的简化形式]
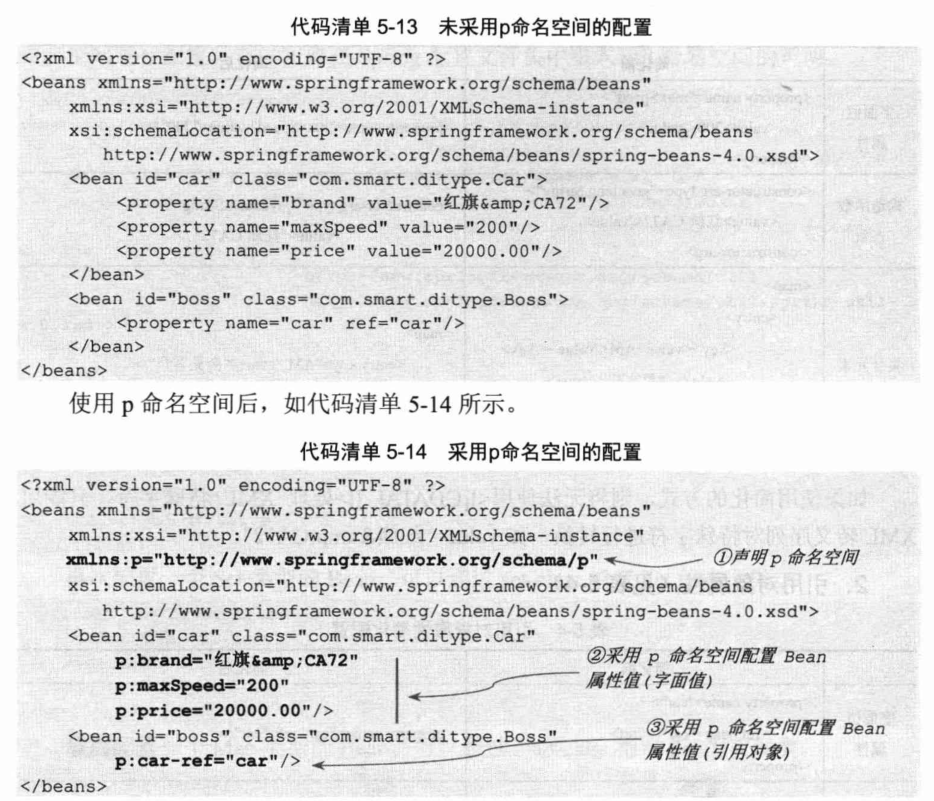
采用p命名空间
字面值格式:
p:<属性名>“xxx”
引用对象的格式
p:<属性名>-ref=“xxx”
由于p命名空间的属性名是可变的,因此没有对应的Schema文件,因此无须在xsi:schemaLocation处指定文件
自动装配
使用注解的配置方式默认采用byType自动装配策略
而XML很少启用自动装配功能
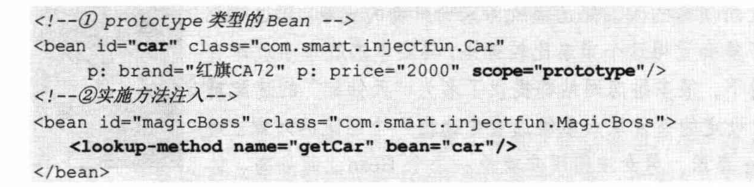
方法注入
向singleton的Boss中注入prototype的Car,并且希望每次调用boss Bean的getCar()方法时都能返回一个新的car Bean。由于singleton的Bean注入关联Bean的动作仅有一次,因此返回的对象还是最开始注入的那个car Bean
其中一个方法时让Boss实现BeanFactoryAware接口
1
2
3
4
| public Car getCar(){
//通过getBean()返回prototype的Bean
return (Car)factory.getBean("car");
}
|
Bean的作用域:
https://www.jianshu.com/p/ee603c566d73
下文也有讲到
lookup方法注入
CGLib可以在运行期动态操作Class字节码,为Bean动态创建子类或实现类,详见第七章(插入link)
声明MagicBoss接口,并声明一个getCar()的接口方法。
通过配置为接口完成动态实现
该方法一般用于通过一个singleton Bean获取一个prototype Bean
方法替换
用某个Bean的方法去替换另一个Bean的方法
 1
 2
 3
 4
 5
 6
 7
 8
 9
10
11
12
13
14
15
16
17
18
19
20
21
| package com.smart.injectfun;
//Boss1返回宝马
public class Boss1 implements MagicBoss{
public Car getCar() {
Car car = new Car();
car.setBrand("宝马Z4");
return car;
}
}
package com.smart.injectfun;
import java.lang.reflect.Method;
import org.springframework.beans.factory.support.MethodReplacer;
public class Boss2 implements MethodReplacer {
public Object reimplement(Object arg0, Method arg1, Object[] arg2)
throws Throwable {
Car car = new Car();
car.setBrand("美人豹");
return car;
}
}
|
用于替换的Bean需要实现MethodReplacer接口
配置
 1
 2
 3
 4
 5
 6
 7
 8
 9
10
11
12
13
14
15
16
17
18
19
20
21
22
23
| <?xml version="1.0" encoding="UTF-8" ?>
<beans xmlns="<http://www.springframework.org/schema/beans>"
xmlns:xsi="<http://www.w3.org/2001/XMLSchema-instance>"
xmlns:p="<http://www.springframework.org/schema/p>"
xsi:schemaLocation="<http://www.springframework.org/schema/beans>
<http://www.springframework.org/schema/beans/spring-beans-4.0.xsd>">
<bean id="car" class="com.smart.injectfun.Car"
p:brand="红旗CA72" p:price="2000" scope="prototype"/>
<bean id="magicBoss" class="com.smart.injectfun.MagicBoss" >
<lookup-method name="getCar" bean="car"/>
</bean>
<bean id="boss2" class="com.smart.injectfun.Boss2"/>
<bean id="boss1" class="com.smart.injectfun.Boss1">
***<replaced-method name="getCar" replacer="boss2"></replaced-method>***
<!--使用Boss2的MethodReplacer接口方法替换getcar()方法-->
</bean>
</beans>
|
Bean之间的关系
继承
父子
 1
 2
 3
 4
 5
 6
 7
 8
 9
10
11
12
| <!-- 父子<bean> -->
<bean id="abstractCar" class="com.smart.tagdepend.Car"
p:brand="红旗CA72" p:price="2000.00" p:color="黑色"
abstract="true"/><!--true代表不实例化为一个Bean-->
<bean id="car3" parent="abstractCar">
<property name="color" value="红色"/>
</bean>
<bean id="car4" parent="abstractCar" >
<property name="color" value="白色"/>
</bean>
<!--如果子bean提供了父bean已有的配置信息,那么将会覆盖父bean中的配置信息-->
|
依赖
一般使用ref元素标签建立对其他Bean的依赖关系
而对于层层依赖的关系,则可以使用depends-on属性显示指定Bean前置依赖的Bean。
例如CacheManager依赖于SystemSettings,而SystemSettings的值由SysInit负责初始化。CacheManager不直接依赖SysInit,但需要SysInit加载完成并设置系统参数设置后再启动,因此要保证SI在CM之前初始化。
1
2
3
| <!-- <bean>的信赖 -->
<bean id="cacheManager" class="com.smart.tagdepend.CacheManager" ***depends-on="sysInit"*** />
<bean id="sysInit" class="com.smart.tagdepend.SysInit" />
|
引用
一个bean要引用另一个bean的id属性值
若设置为
1
2
3
| <bean id="car" class="com.smart.tagdepend.Car"/>
<bean id="boss" class="com.smart.tagdepend.Boss"
p: carId = "car" scope = "prototype"/>
|
则只是以字面值的形式进行设置,但两者没有建立引用关系,而Spring容器不会在启动时对属性配置值进行特殊检查,因此这样设置会等到具体调用时才会发现错误。
因此通过标签,可以提前发现错误
1
2
3
4
5
6
7
| <!-- <bean>引用 -->
<bean id="car" class="com.smart.tagdepend.Car"/>
<bean id="boss" class="com.smart.tagdepend.Boss" >
<property name="carId" >
<idref bean = "car"/>
</property>
</bean>
|
整合多个配置文件
若有多个XML配置文件,可以用String数组来指定,或者使用将多个配置文件引入到一个文件中。
 1
 2
 3
 4
 5
 6
 7
 8
 9
10
11
12
| <?xml version="1.0" encoding="UTF-8" ?>
<beans xmlns="<http://www.springframework.org/schema/beans>"
xmlns:xsi="<http://www.w3.org/2001/XMLSchema-instance>"
xmlns:p="<http://www.springframework.org/schema/p>"
xsi:schemaLocation="<http://www.springframework.org/schema/beans>
<http://www.springframework.org/schema/beans/spring-beans-4.0.xsd>">
**<import resource="classpath:com/smart/impt/beans1.xml"/>**
<bean id="boss1" class="com.smart.fb.Boss"
p:name="John" p:car-ref="car1"/>
<bean id="boss2" class="com.smart.fb.Boss"
p:name="John" p:car-ref="car2"/>
</beans>
|
注意:
若一个配置文件a.xml定义的bean引用了b.xml中的bean,则不一定要使用,只需要两个配置文件都在配置文件列表中即可。
若采用import,则容器启动时仅需要加载a.xml即可,否则需要同时加载a和b.xml,以便在内存中合并。
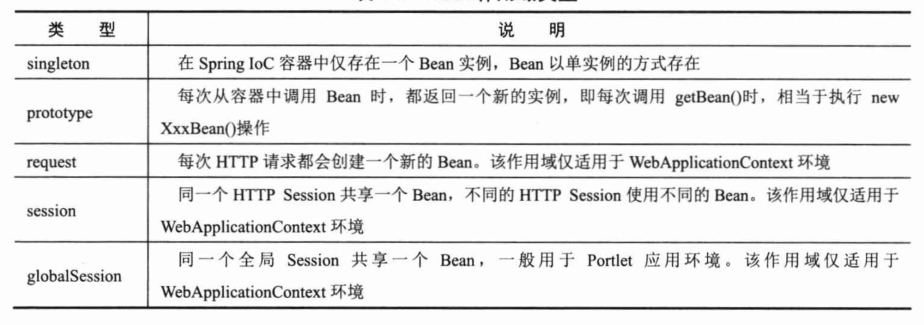
Bean作用域
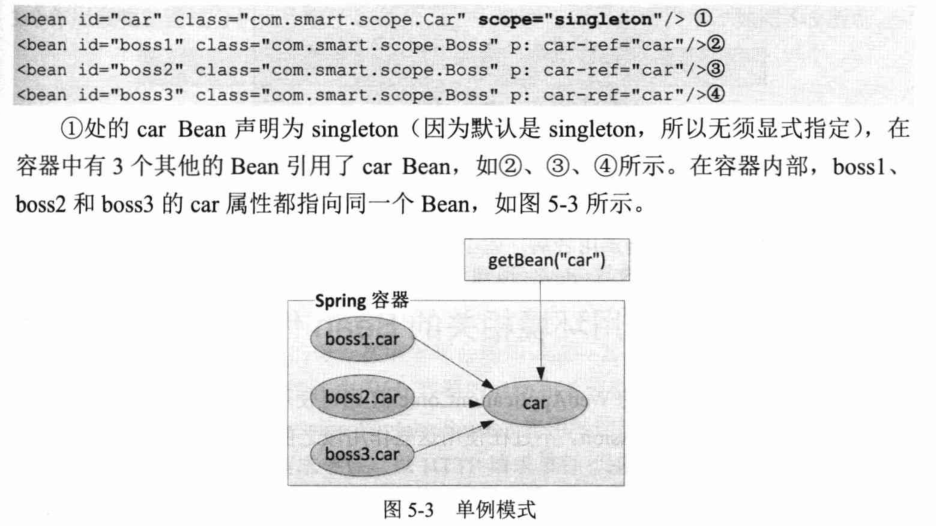
singleton作用域
singleton的Bean在同一Spring IoC中只有一个实例
ApplicationContext容器在启动时,自动实例化所有的singleton的Bean并缓存于容器中。
这样有两个好处:
①可以及早发现一些潜在的配置问题
②Bean以缓存的方式保存,再需要用到该Bean时就无需再实例化了。
若不希望提前实例化,则可以通过lazy-init控制
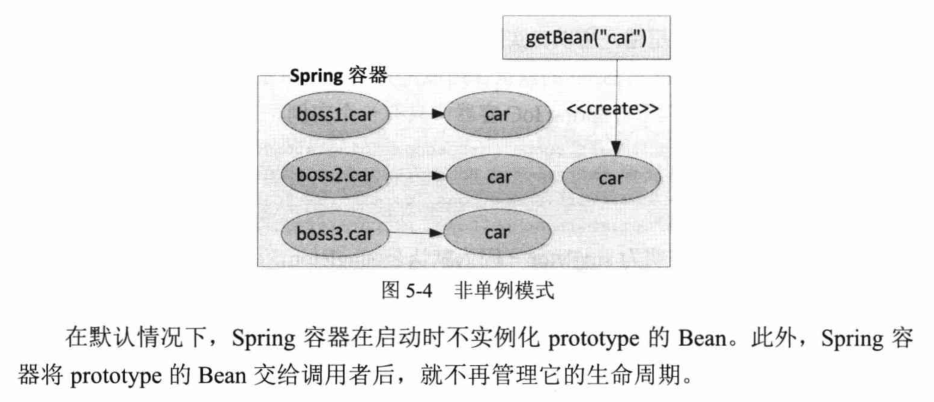
prototype作用域
boss的三个bean引用的都是一个新的实例,并且每次通过容器的getBean()方法返回的都是一个新的实例
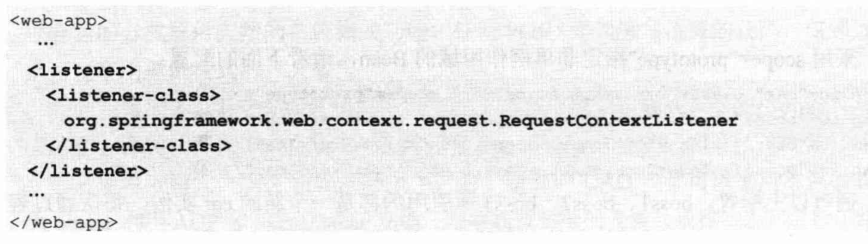
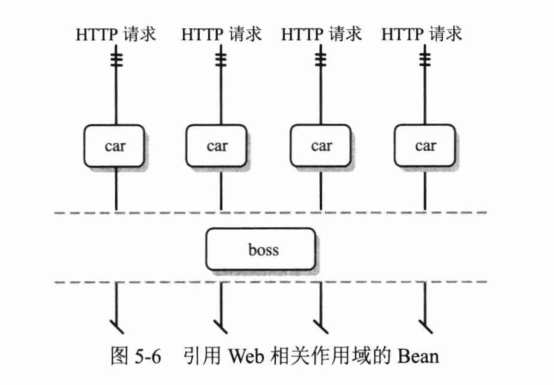
与Web应用相关的作用域
使用WebApplicationContext可以使用另外三种作用域,但需要进行额外配置
利用HTTP请求监听器进行配置
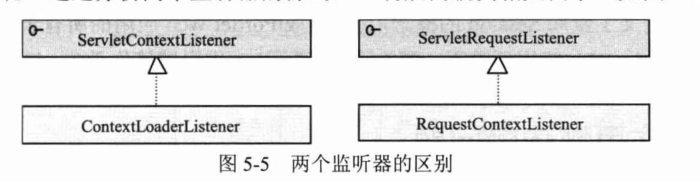
ContextLoaderListener和RequestContextListener区别:
ServletContextListener只负责监听Web容器启动和关闭的事件,而另外一个监听器监听HTTP请求事件,Web服务器接收的每一次请求都会通知该监听器。
Spring容器启动和关闭操作由Web容器的启动和关闭事件触发(Context…),如果Spring容器中的Bean需要另外三种作用域的支持,则Spring容器本身必须获得Web容器的HTTP请求事件(Request…),用该事件来“驱动”Bean作用域的控制逻辑
request作用域
该作用域的Bean对于一个HTTP请求和生命周期
每次HTTP请求调用Bean的时候,容器就会创建一个新的Bean,请求处理完毕后,就会销毁这个Bean
session作用域
Bean的作用域横跨整个HTTP Session,Session中的所有HTTP请求共享一个Bean,当HTTP Session结束后才销毁实例
globalSession作用域
类似于session作用域,但仅在Portlet的Web应用中使用,如果不在Protlet Web应用中,则等价于session作用域
作用域依赖问题
非Web相关作用域引用Web相关作用域的Bean
为了使boss能从适当作用域中获取car的引用,需要使用AOP为car配置一个代理类
当boss Bean在Web环境下调用car Bean时,Spring AOP将期用动态代理智能地判断boss 在哪个HTTP请求线程中,并从对应的HTTP请求线程域中获取对应的car
由于car Bean的作用域为request,所有每个调用到car的HTTP请求都会创建一个car Bean,通过动态代理,使boss引用到对应HTTP请求的car
在配置文件中添加了
aop:scoped-proxy/
后 ,注入boss的使car Bean的动态代理对象,不是原来的car Bean。
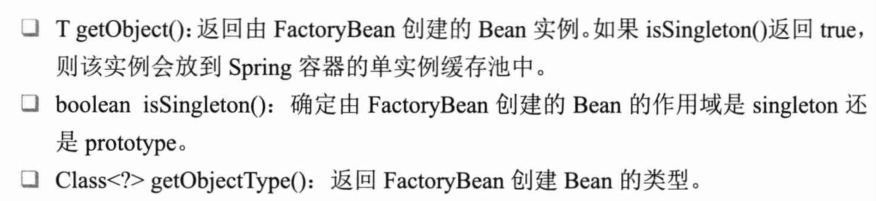
FactoryBean
某些情况下,通过反射机制利用bean的class属性指定实现类实例化Bean的过程会比较复杂,这时候可以使用工厂类接口org.springframework.beans.factory.FactoryBean
该接口定义了三个接口方法:
当配置文件中bean的class属性配置的实现类使FactoryBean时,通过getBean()方法返回的不是FactoryBean本身,而是FactoryBean#getObject()方法所返回的对象。
编写一个FactoryBean实现类,通过逗号分隔的方式一次性为Car的所有属性指定配置值
 1
 2
 3
 4
 5
 6
 7
 8
 9
10
11
12
13
14
15
16
17
18
19
20
21
22
23
24
25
26
27
28
29
30
| import org.springframework.beans.factory.FactoryBean;
public class CarFactoryBean implements FactoryBean<Car> {
private String carInfo;
public String getCarInfo() {
return carInfo;
}
//接收逗号分隔的属性设置信息
public void setCarInfo(String carInfo) {
this.carInfo = carInfo;
}
//实例化car Bean
public Car getObject() throws Exception {
Car car = new Car();
String[] infos = carInfo.split(",");
car.setBrand(infos[0]);
car.setMaxSpeed(Integer.parseInt(infos[1]));
car.setPrice(Double.parseDouble(infos[2]));
return car;
}
//返回car的类型
public Class<Car> getObjectType() {
return Car.class;
}
public boolean isSingleton() {
return false;
}
}
|
配置
1
2
| <bean id="car1" class="com.smart.fb.CarFactoryBean"
p:carInfo="红旗CA72,200,20000.00"/>
|
基于注解的配置
使用注解定义Bean
1
2
3
4
5
6
| import org.springframework.stereotype.Component;
//通过Component定义一个DAO的Bean
@Component("userDao")
public class UserDao {
}
|
等效于
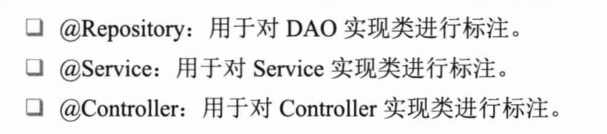
除了@Component外,Spring还提供了3个注解:
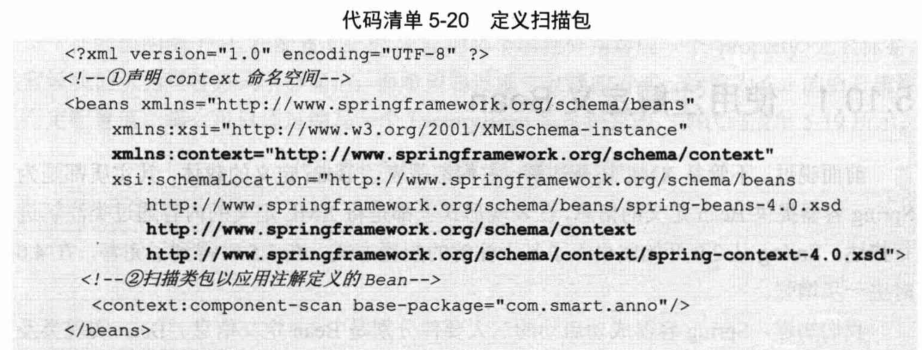
扫描注解定义的Bean
②处通过base-package属性指定了一个需要扫描的基类包,Spring会扫描该基类包的所有类,并从类的注解信息中获取Bean的定义信息。
可以使用resource-pattern属性过滤出特定的类
<context: compontent-scan base-package=“com.smart” resource-pattern=“anno/*.class”/>
默认情况下resource-pattern属性的值为"**/*.class",即基类包中的所有类
若仅需要过滤基类包中实现了某个接口的类或标注了某个特定注解的类,resource-pattern无法实现,需要使用<context:component-scan>的过滤子元素
例如:

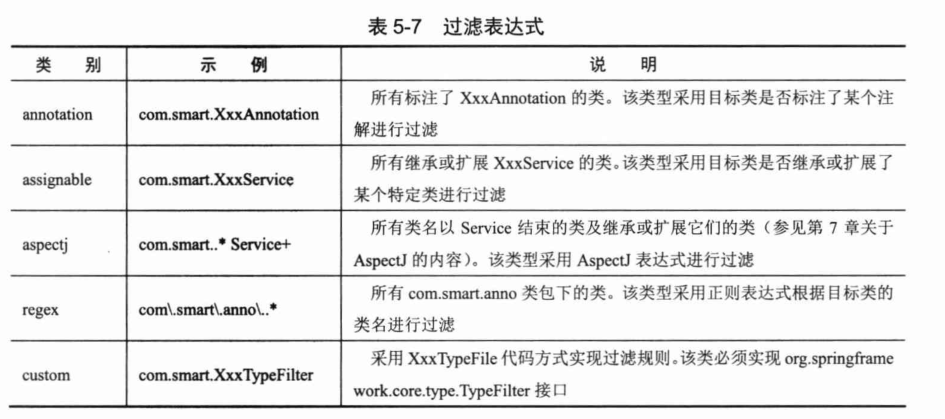
include表示要包含的目标类,而exclude表示要排除的目标类,一个子过滤属性可以有若干个Include和exclude,过滤表达式如下图
除了custom类型外,aspectj的过滤表达能力最强,可实现其他类型所表达的过滤规则
在<context:component-scan/>中还要一个属性:use-default-filters,默认值为true,表示默认会对标注@Component、@Controller、@Service和@Reposity。
<context:component-scan/>会根据<exclude-filter/>列出需要排除的黑名单,再根据<include-filter>列出需要包含的白名单,由于默认值为true,因此会对所有Bean进行扫描。
若改为false:

则仅扫描@Controller的bean。
自动装配Bean
Autowired进行自动注入
1
2
3
4
5
6
7
8
| @Service //定义一个Service的Bean
public class LogonService implements BeanNameAware {
//分别注入LogDao及UserDao的Bean
@Autowired
private LogDao logDao;
@Autowired
private UserDao userDao;
|
@Autowired默认按类型(byType)匹配的方式在容器中查找匹配的Bean,当且仅当只有一个匹配的Bean时,Spring将其注入@Autowired标注的变量中。
使用@Autowired的required属性
如果容器中没有一个和标注变量类型匹配的Bean,那么Spring容器启动的时候将报错(NoSuchBeanDefinitionException异常),如果希望Spring即使找不到匹配的Bean完成注入也不要抛出异常,则可以使用@Autowired(required=false)进行标注。默认值为true
1
2
| @Autowired(required=false)
private LogDao logDao;
|
使用@Qualifier指定注入Bean的名称
如果容器内不止一个匹配的Bean,则通过@Qualifer注解限定Bean的名称
1
2
3
| @Autowired
@Qualifier("userDao")//注入名为userDao的Bean
private UserDao userDao;
|
对类方法进行标注
@Autowired可以对类成员变量及方法的入参进行标注
 1
 2
 3
 4
 5
 6
 7
 8
 9
10
11
12
13
14
| //自动将userDao的Bean传给方法入参
@Autowired
@Qualifier("userDao")
public void setUserDao(UserDao userDao) {
System.out.println("auto inject");
this.userDao = userDao;
}
//自动将LogDao传给方法入参
@Autowired
public void setLogDao(LogDao logDao) {
this.logDao = logDao;
}
|
如果一个方法拥有多个入参,默认情况下Spring将自动选择匹配入参类型的Bean进行注入。可以使用@Qualifier以指定注入Bean的名称
1
2
3
4
5
| @Autowired
public void init(@Qualifier("userDao")UserDao userDao,LogDao logDao){
System.out.println("multi param inject");
this.userDao = userDao;
this.logDao =logDao;
|
一般大部分Bean为singleton的,所以一般无需通过注解的value属性为Bean指定名称,也无需使用@Qualifier注解按名称进行注入
实际项目中建议在方法上标注@Autowired注解。
对集合类进行标注
如果对类中集合类的变量或方法入参进行@Autowired标注,那么Spring会将容器中类型匹配的所有Bean自动注入进来。
 1
 2
 3
 4
 5
 6
 7
 8
 9
10
11
12
13
14
15
16
17
18
19
| import java.util.*;
import org.springframework.beans.factory.annotation.Autowired;
import org.springframework.stereotype.Component;
@Component
public class MyComponent {
//将容器中所有类型为Plugin的Bean注入该变量中
@Autowired(required=false)
private List<Plugin> plugins;
//将Plugin类型的Bean注入到Map中
@Autowired
private Map<String,Plugin> pluginMaps;
public List<Plugin> getPlugins() {
return plugins;
}
}
|
plugin有两个实现类
1
2
3
4
5
6
| //pluginone
@Component
@Order(value = 1)//指定此插件的加载顺序,值越小,优先级越高
public class OnePlugin implements Plugin{
}
|
1
2
3
4
5
6
| //plugintwo
@Component
@Order(value = 2)
public class TwoPlugin implements Plugin{
}
|
对延迟依赖注入的支持
在Bean上标注@Lazy和@Autowired注解的属性,延迟到调用此属性时才注入属性值
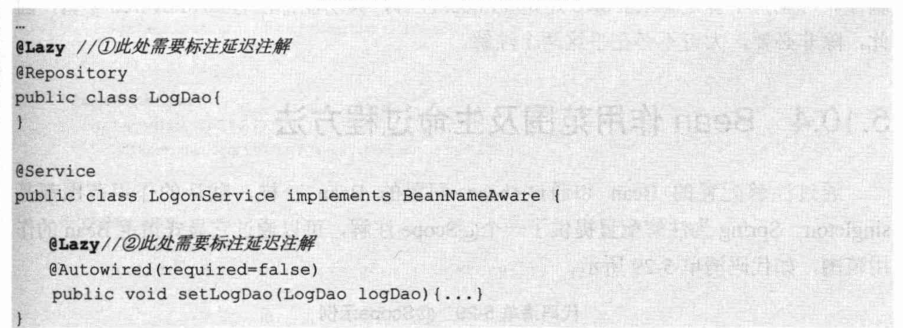
注意:@Lazy注解后面要跟上属性及目标Bean上
Bean作用范围及生命过程方法
使用注解配置的Bean与XML配置的Bean的默认作用范围都为singleton。
使用@Scope注解可以显示指定Bean的作用范围
 1
 2
 3
 4
 5
 6
 7
 8
 9
10
11
12
13
14
15
16
17
18
19
20
21
22
23
24
25
26
27
28
29
30
31
32
33
34
35
36
37
38
39
40
41
42
43
| import org.springframework.beans.factory.config.BeanDefinition;
import org.springframework.context.annotation.Scope;
import org.springframework.stereotype.Component;
//指定Bean的作用范围为prototype
@Scope(BeanDefinition.SCOPE_PROTOTYPE)
@Component
public class Car {
private int maxSpeed;
public String brand;
private double price;
public static String HONG_QI = "红旗";
public String getBrand() {
return brand;
}
public void setBrand(String brand) {
this.brand = brand;
}
public int getMaxSpeed() {
return maxSpeed;
}
public void setMaxSpeed(int maxSpeed) {
this.maxSpeed = maxSpeed;
}
public double getPrice() {
return price;
}
public void setPrice(double price) {
this.price = price;
}
public String toString(){
return "brand:"+brand+"/maxSpeed:"+maxSpeed+"/price:"+price;
}
}
|
使用@PostConstruct和@PreDestroy注解可以指定Bean的初始化及容器销毁前执行的方法。在一个Bean中可以定义多个两种注解。
 1
 2
 3
 4
 5
 6
 7
 8
 9
10
11
12
13
14
15
16
17
18
19
20
21
22
23
24
25
26
27
28
29
30
31
32
33
34
35
36
37
38
39
40
41
42
| @Component
public class Boss {
private Car car;
public Boss(){
System.out.println("construct...");
}
@Autowired
private void setCar(Car car){
System.out.println("execute in setCar");
this.car = car;
}
@Resource
private void setCar(Car car){
System.out.println("execute in setCar");
this.car = car;
}
@PostConstruct
private void init1(){
System.out.println("execute in init1");
}
@PostConstruct
private void init2(){
System.out.println("execute in init1");
}
@PreDestroy
private void destory1(){
System.out.println("execute in destory1");
}
@PreDestroy
private void destory2(){
System.out.println("execute in destory2");
}
}
|
运行测试:
结果:


说明Spring先调用Boss的构造函数实例化Bean,再执行@Autowired进行自动注入,然后分别执行标注了@PostConstruct的方法,再容器关闭时,执行标注了@PreDestroy的方法
基于Java类的配置
JavaConfig
普通的POJO标注@Configuration注解,可以为Spring容器提供Bean定义的信息,每一个@Bean的类方法相当于提供一个Bean的定义信息
 1
 2
 3
 4
 5
 6
 7
 8
 9
10
11
12
13
14
15
16
17
18
19
20
21
22
23
24
25
26
27
28
| import org.springframework.context.annotation.Bean;
import org.springframework.context.annotation.Configuration;
//将一个POJO标注为定义Bean的配置类
@Configuration
public class AppConf {
//定义两个Bean,并提供实例化逻辑
@Bean
public UserDao userDao(){
return new UserDao();
}
@Bean
public LogDao logDao(){
return new LogDao();
}
//定义logonService的Bean
@Bean
public LogonService logonService(){
LogonService logonService = new LogonService();
//将前面的两个Bean注入
logonService.setLogDao(logDao());
logonService.setUserDao(userDao());
return logonService;
}
}
|
以上配置等效于
1
2
3
4
| <bean id="userDao" class="com.smart.anno.UserDao"/>
<bean id="logDao" class="com.smart.anno.LogDao"/>
<bean id="logonService" class="com.smart.conf.LogonService"
p:logDao-ref="userDao" p:userDao-ref="logDao"/>
|
如果需要引用不同配置类中定义的Bean,则将所需引用的Bean所在的配置类作为Bean注入到调用配置类中
由于@Configuration注解类本身标注了@Component,因此它们可以像普通的Bean注入其他的Bean中。
 1
 2
 3
 4
 5
 6
 7
 8
 9
10
11
12
13
14
15
16
17
18
19
20
21
22
| import org.springframework.beans.factory.annotation.Autowired;
import org.springframework.context.annotation.Bean;
import org.springframework.context.annotation.Configuration;
import org.springframework.context.annotation.Import;
@Configuration
public class ServiceConfig {
//自动注入DaoConfig
@Autowired
private DaoConfig daoConfig;
@Bean
public LogonService logonService(){
LogonService logonService = new LogonService();
System.out.println(daoConfig.logDao() == daoConfig.logDao());
//调用Bean的相关方法
logonService.setLogDao(daoConfig.logDao());
logonService.setUserDao(daoConfig.userDao());
return logonService;
}
}
|
调用logDao和userDao方法的时候,Spring会对配置类所有标注@Bean的方法进行AOP增强,将对Bean生命周期管理的逻辑植入进来,因此调用方法的时候将从容器中返回相应Bean的单例。在@Bean处,还可以标注@Scope注解以控制Bean的作用范围。
注意:容器会自动对@Configuration的类进行改造,以植入Spring容器对Bean的管理逻辑,因此需要保证aop类包和CGLIB类包加载到类路径下。
 1
 2
 3
 4
 5
 6
 7
 8
 9
10
11
12
13
14
15
| @Configuration
public class DaoConfig {
@Bean(name="")
public UserDao userDao(){
return new UserDao();
}
@Scope("prototype")
@Bean
public LogDao logDao(){
return new LogDao();
}
}
|
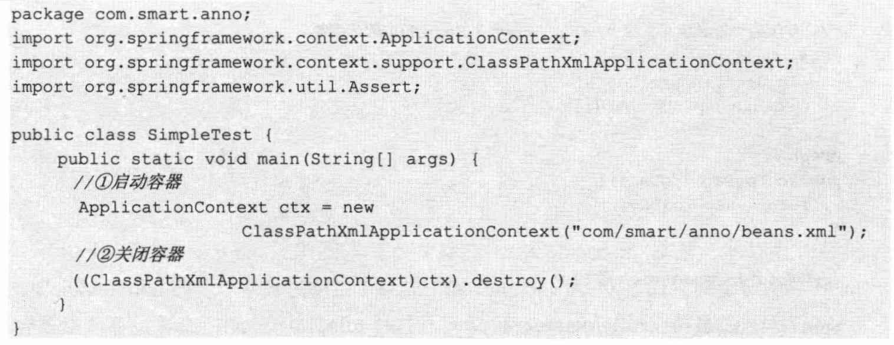
启动容器
使用@Configuration启动
 1
 2
 3
 4
 5
 6
 7
 8
 9
10
11
12
13
14
15
16
17
18
19
20
21
22
23
24
25
26
27
28
29
30
31
32
33
34
| import org.springframework.context.ApplicationContext;
import org.springframework.context.annotation.AnnotationConfigApplicationContext;
public class JavaConfigTest {
public static void main(String[] args) {
//1.通过构造函数加载配置类
ApplicationContext ctx = new AnnotationConfigApplicationContext(AppConf.class);
//2.通过编码方式注册配置类,加载多个配置类(或者将多个配置类组装到一个配置类中,这样仅需注册这个组装好的配置类就可以启动容器)
AnnotationConfigApplicationContext ctx = new AnnotationConfigApplicationContext();
ctx.register(DaoConfig.class);
ctx.register(ServiceConfig.class);
ctx.refresh();
//组装(在ServiceConfig.class文件中):
@Configuration
@Import(DaoConfig.class)
public class ServiceConfig {
@Autowired
private DaoConfig daoConfig;
@Bean
public LogonService logonService(){
LogonService logonService = new LogonService();
System.out.println(daoConfig.logDao() == daoConfig.logDao());
logonService.setLogDao(daoConfig.logDao());
logonService.setUserDao(daoConfig.userDao());
return logonService;
}
}
//这样就只需要注册ServiceConfig即可
}
}
|
通过XML引用@Configuration
希望使用XML启动容器,需要在XML中通过< context:component-scan >扫描到相应的配置类即可
 1
 2
 3
 4
 5
 6
 7
 8
 9
10
11
12
| <?xml version="1.0" encoding="UTF-8" ?>
<beans xmlns="http://www.springframework.org/schema/beans"
xmlns:xsi="http://www.w3.org/2001/XMLSchema-instance"
xmlns:context="http://www.springframework.org/schema/context"
xsi:schemaLocation="http://www.springframework.org/schema/beans
http://www.springframework.org/schema/beans/spring-beans-4.0.xsd
http://www.springframework.org/schema/context
http://www.springframework.org/schema/context/spring-context-4.0.xsd">
<!--通过上下文扫描加载到AppConf的配置类-->
<context:component-scan base-package="com.smart.conf"
resource-pattern="AppConf.class" />
</beans>
|
通过@Configuration配置类引用XML
通过@ImportResource引入XML配置文件,通过@Autowired引用XML配置文件中定义的Bean
 1
 2
 3
 4
 5
 6
 7
 8
 9
10
11
12
13
14
15
16
17
18
19
20
| import org.springframework.beans.factory.annotation.Autowired;
import org.springframework.context.annotation.Bean;
import org.springframework.context.annotation.Configuration;
import org.springframework.context.annotation.ImportResource;
//通过@ImportResource引入XML文件
@Configuration
@ImportResource("classpath:com/smart/conf/beans3.xml")
public class LogonAppConfig {
//自动注入XML文件中定义的Bean
@Bean
@Autowired
public LogonService logonService(UserDao userDao,LogDao logDao){
LogonService logonService = new LogonService();
logonService.setUserDao(userDao);
logonService.setLogDao(logDao);
return logonService;
}
}
|
只要不同形式的Bean定义信息能加载到Spring容器中,即可完成Bean之间的装配,不一定要引入XML文件
基于Groovy DSL的配置
类似于XML,只是配置信息由Groovy脚本表达
 1
 2
 3
 4
 5
 6
 7
 8
 9
10
11
12
13
14
15
16
17
18
19
20
21
22
23
24
25
26
27
28
29
30
31
32
33
34
35
36
37
38
39
40
41
42
43
44
45
46
47
48
49
| import com.smart.groovy.LogDao
import com.smart.groovy.DbUserDao
import com.smart.groovy.LogonService
import com.smart.groovy.XmlUserDao
import org.springframework.core.io.ClassPathResource
beans {
//声明context命名空间
xmlns context: "http://www.springframework.org/schema/context" //导入命名空间
//与注解混合使用,定义Bean扫描包路径
context.'component-scan'('base-package': "com.smart.groovy") {
//排除不需要扫描的包路径
'exclude-filter'('type': "aspectj", 'expression': "com.smart.xml.*")
}
//读取app-conf.properties配置文件
def stream;
def config = new Properties();
try{
stream = new ClassPathResource('conf/app-conf.properties').inputStream
config.load(stream);
}finally {
if(stream!=null)
stream.close()
}
//配置无参构造函数Bean
logDao(LogDao){
bean->
bean.scope = "prototype" //配置作用域
bean.initMethod="init" //配置初始化方法
bean.destroyMethod="destory" //配置销毁方法
bean.lazyInit =true //配置懒加载
}
//根据条件注入Bean
if( config.get("dataProvider") == "db"){
userDao(DbUserDao)
}else{
userDao(XmlUserDao)
}
//配置有参构造函数注入Bean,参数是userDao
logonService(LogonService,userDao){
logDao = ref("logDao") //配置属性注入,引用Groovy定义Bean
mailService = ref("mailService") //配置属性注入,引用注解定义
}
}
|
启动容器
使用GenericGroovyApplicationContext
 1
 2
 3
 4
 5
 6
 7
 8
 9
10
11
12
13
14
15
16
17
18
19
20
21
22
23
24
25
26
27
28
| import org.springframework.context.ApplicationContext;
import org.springframework.context.support.GenericGroovyApplicationContext;
import org.testng.annotations.Test;
import static org.testng.Assert.assertEquals;
import static org.testng.Assert.assertNotNull;
import static org.testng.Assert.assertTrue;
public class LogonServiceTest {
@Test
public void getBean(){
//加载指定Groovy Bean配置文件来启动容器
ApplicationContext ctx = new GenericGroovyApplicationContext("classpath:com/smart/groovy/spring-context.groovy");
LogDao logDao = ctx.getBean(LogDao.class);
//加载Groovy定义的Bean
LogonService logonService = ctx.getBean(LogonService.class);
assertNotNull(logonService);
//加载注解定义的Bean
MailService mailService = ctx.getBean(MailService.class);
assertNotNull(mailService);
//判断注入是否是DbUserDao
UserDao userDao = ctx.getBean(UserDao.class);
assertTrue(userDao instanceof DbUserDao);
}
}
|
通过编码方式动态加载Bean
通过DefaultListableBeanFactory
DefaultListableBeanFactory实现了ConfigurableListableBeanFactory接口,提供了可扩展配置、循环枚举的功能,通过此类实现Bean动态注入
为了保证动态注入的Bean能被AOP增强,需要实现Bean工厂后置处理器接口BeanFactoryPostProcessor
 1
 2
 3
 4
 5
 6
 7
 8
 9
10
11
12
13
14
15
16
17
18
19
20
21
22
23
24
25
26
27
28
29
| import org.springframework.beans.BeansException;
import org.springframework.beans.factory.config.BeanFactoryPostProcessor;
import org.springframework.beans.factory.config.ConfigurableListableBeanFactory;
import org.springframework.beans.factory.support.BeanDefinitionBuilder;
import org.springframework.beans.factory.support.DefaultListableBeanFactory;
import org.springframework.stereotype.Component;
@Component
public class UserServiceFactoryBean implements BeanFactoryPostProcessor {
public void postProcessBeanFactory(ConfigurableListableBeanFactory bf) throws BeansException {
//①将ConfigurableListableBeanFactory转化为DefaultListableBeanFactory
DefaultListableBeanFactory beanFactory = (DefaultListableBeanFactory) bf;
//②通过BeanDefinitionBuilder创建Bean定义
BeanDefinitionBuilder beanDefinitionBuilder = BeanDefinitionBuilder.genericBeanDefinition(UserService.class);
//③设置属性userDao,此属性引用已经定义的bean:userDao
beanDefinitionBuilder.addPropertyReference("userDao","userDao");
//④注册Bean定义
beanFactory.registerBeanDefinition("userService1", beanDefinitionBuilder.getRawBeanDefinition());
//⑤直接注册一个Bean实例
beanFactory.registerSingleton("userService2",new UserService());
}
}
|
扩展自定义标签
步骤:
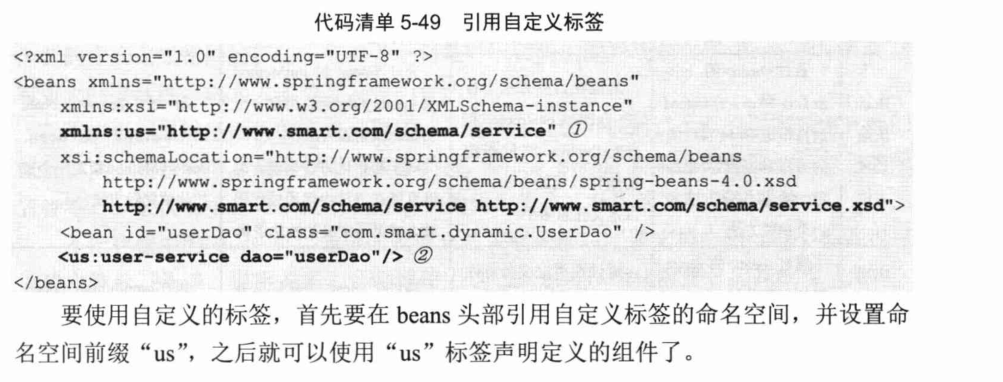
(1)采用XSD描述自定义标签的元素属性
(2)编写Bean定义的解析器
(3)注册自定义标签解析器
(4)绑定命名空间解析器
 1
 2
 3
 4
 5
 6
 7
 8
 9
10
11
12
13
14
15
16
17
18
19
20
21
22
| <?xml version="1.0" encoding="UTF-8"?>
<xsd:schema xmlns="http://www.smart.com/schema/service"
xmlns:xsd="http://www.w3.org/2001/XMLSchema"
xmlns:beans="http://www.springframework.org/schema/beans"
<!--指定自定义标签的命名空间-->
targetNamespace="http://www.smart.com/schema/service"
elementFormDefault="qualified"
attributeFormDefault="unqualified">
<!--导入Spring本身的beans的命名空间-->
<xsd:import namespace="http://www.springframework.org/schema/beans"/>
<!--定义一个user-service标签-->
<xsd:element name="user-service">
<xsd:complexType>
<xsd:complexContent>
<!--定义了user-service标签的扩展属性"dao",类似继承方式-->
<xsd:extension base="beans:identifiedType">
<xsd:attribute name="dao" type="xsd:string" use="required"/>
</xsd:extension>
</xsd:complexContent>
</xsd:complexType>
</xsd:element>
</xsd:schema>
|
接着编写用户服务标签解析类
 1
 2
 3
 4
 5
 6
 7
 8
 9
10
11
12
13
14
15
16
17
18
19
20
21
22
23
| import org.springframework.beans.factory.config.BeanDefinition;
import org.springframework.beans.factory.parsing.BeanComponentDefinition;
import org.springframework.beans.factory.support.AbstractBeanDefinition;
import org.springframework.beans.factory.support.BeanDefinitionBuilder;
import org.springframework.beans.factory.xml.BeanDefinitionParser;
import org.springframework.beans.factory.xml.ParserContext;
import org.w3c.dom.Element;
public class UserServiceDefinitionParser implements BeanDefinitionParser {
public BeanDefinition parse(Element element, ParserContext parserContext) {
//通过BeanDefinitionBuilder创建Bean定义
BeanDefinitionBuilder beanDefinitionBuilder = BeanDefinitionBuilder.genericBeanDefinition(UserService.class);
String dao = element.getAttribute("dao");
//获取自定义标签的属性
beanDefinitionBuilder.addPropertyReference("userDao",dao);
AbstractBeanDefinition beanDefinition = beanDefinitionBuilder.getBeanDefinition();
//注册BEAN定义
parserContext.registerBeanComponent(new BeanComponentDefinition( beanDefinition,"userService"));
return null;
}
}
|
接着将解析器注册到Spring命名空间解析器
 1
 2
 3
 4
 5
 6
 7
 8
 9
10
| package com.smart.dynamic;
import org.springframework.beans.factory.xml.NamespaceHandlerSupport;
public class UserServiceNamespaceHandler extends NamespaceHandlerSupport {
public void init() {
registerBeanDefinitionParser("user-service", new UserServiceDefinitionParser());
}
}
|
绑定自定义Bean解析器,只需要继承NamespaceHandlerSupport类,实现NamespaceHandler#init()方法,并在init()方法中注册自定义Bean解析器
最后需要告诉Spring如何解析自定义标签,在源码resoure目录创建META-INF文件夹,并在其中创建spring.handlers和spring.schemas两个文件,告诉Spring自定义标签的文档结构及解析它的类
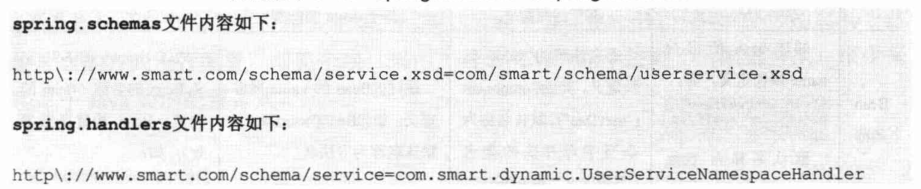
在schemas中告诉Spirng描述自定义标签的文档结构文件所在位置
在handles文件中告诉Spring自定义命名空间所对应的解析器
使用自定义标签
不同配置方式比较
| 基于XML配置 | 基于注解配置 | 基于Java类配置 | 基于Groovy DSL配置 |
|---|
| Bean定义 | 在XML文件中
通过<bean>元素定义Bean,如
<bean
class=“com.smart.UserDao”/> | 在 Bean实现类处通过标注@Compoent或衍型类(@Repository、@Service及@Controller ) 定义Bean | 在标注了@Configuration的Java类中,通过在类方法上标注@Bean定义一个Bean。方法必须提供Bean的实例化逻辑 | 在 Groovy文件中通过DSL定义Bean,如:
userDao (UserDao) |
| Bean名称 | 通过的id或
name属性定义,如:<bean id-“userDao"class-” com. smart.UserDao"/>
默认名称为com.
smart.UserDao#0 | 通过注解的value属性定义,如@Component(“userDao”)。默认名称为小写字母开头的类名(不带包名)userDao | 通过@Bean的name属性定义,如@Bean(“userDao”)。默认名称为方法名 | 通过Groovy 的 DSL定义Bean的名称(Bean的类型,Bean构建函数参数),如:
logonService (LogonService,userDao) |
| Bean注入 | 通过子元素或通过p命名空间的动态属性,如p:
userDao-ref-“userDao"进行注入 | 通过在成员变更或方法入参处标注@Autowired,按类型匹配自动注入。还可以配合使用@Qualifier按名称匹配方式注入 | 比较灵活,可以在方法处通过@Autowired使方法入参绑定Bean,然后在方法中通过代码进行注入;还可通过调用配置类的@Bean方法进行注入 | 比较灵活,可以在方法处通过ref0方法进行注入,如ref(““logDao””) |
| Bean生命过程方法 | 通过的init-method和 destory-method·属性指定Bean实现类的方法名。最多只能指定一个初始化方法和一个销毁方法 | 通过在目标方法上标注@PostConstruct和@PreDestroy注解指定初始化或销毁方法,可以定义任意多个 | 通过@Bean的initMethod或destoryMethod指定一个初始化或销毁方法。
对于初始化方法来说,可以直接在方法内部通过代码的方式灵活定义初始化逻辑 | 通过bean->bean.initMethod或bean.destoryMethod指定一个初始化或销毁方法 |
| Bean作用范围 | 通过的scope属性指定,如:
<bean class=“com.smart.UserDao .
scope-” prototype”/> | 通过在类定义处标注@Scope指定,如@Scope(“prototype”) | 通过在 Bean方法定义处标注@Scope指定 | 通过bean-> bean.scope=“prototype"指定 |
| Bean延迟初始化 | 通过的lazy-init属性指定,默认为default,继承于beans>的
default-
lazy-init设置,该值默认为false | 通过在类定义处标注@Lazy指定,如@Lazy(true) | 通过在 Beam方法定义处标注@Lazy指定 | 通过bean-> bean. lazylnit =true指定 |